|
|
Ben's UniverseElectronics, programming, and more |
|
| Home | Electronics | Software | Automotive | Miscellaneous |
|
|
|
Ben's UniverseElectronics, programming, and more |
|
| Home | Electronics | Software | Automotive | Miscellaneous |
|

Radiator Fan Replacement for Dodge Stealth/3000GTAutomotive July 17, 2021 by BenI was having trouble with overheating issues on my 1993 Dodge Stealth R/T TT, and I decided to replace the radiator fan motor. If you are replacing the entire radiator fan, this guide still applies, but you may be able to skip some steps, especially when it comes to disassembling the radiator fan assembly to get to the motor. Although this guide has many steps, the repair is relatively straightforward. Contents
PartsThe parts needed for this repair are as follows:
If you wish to replace the existing OEM bolts with new ones (due to age), the list is as follows:
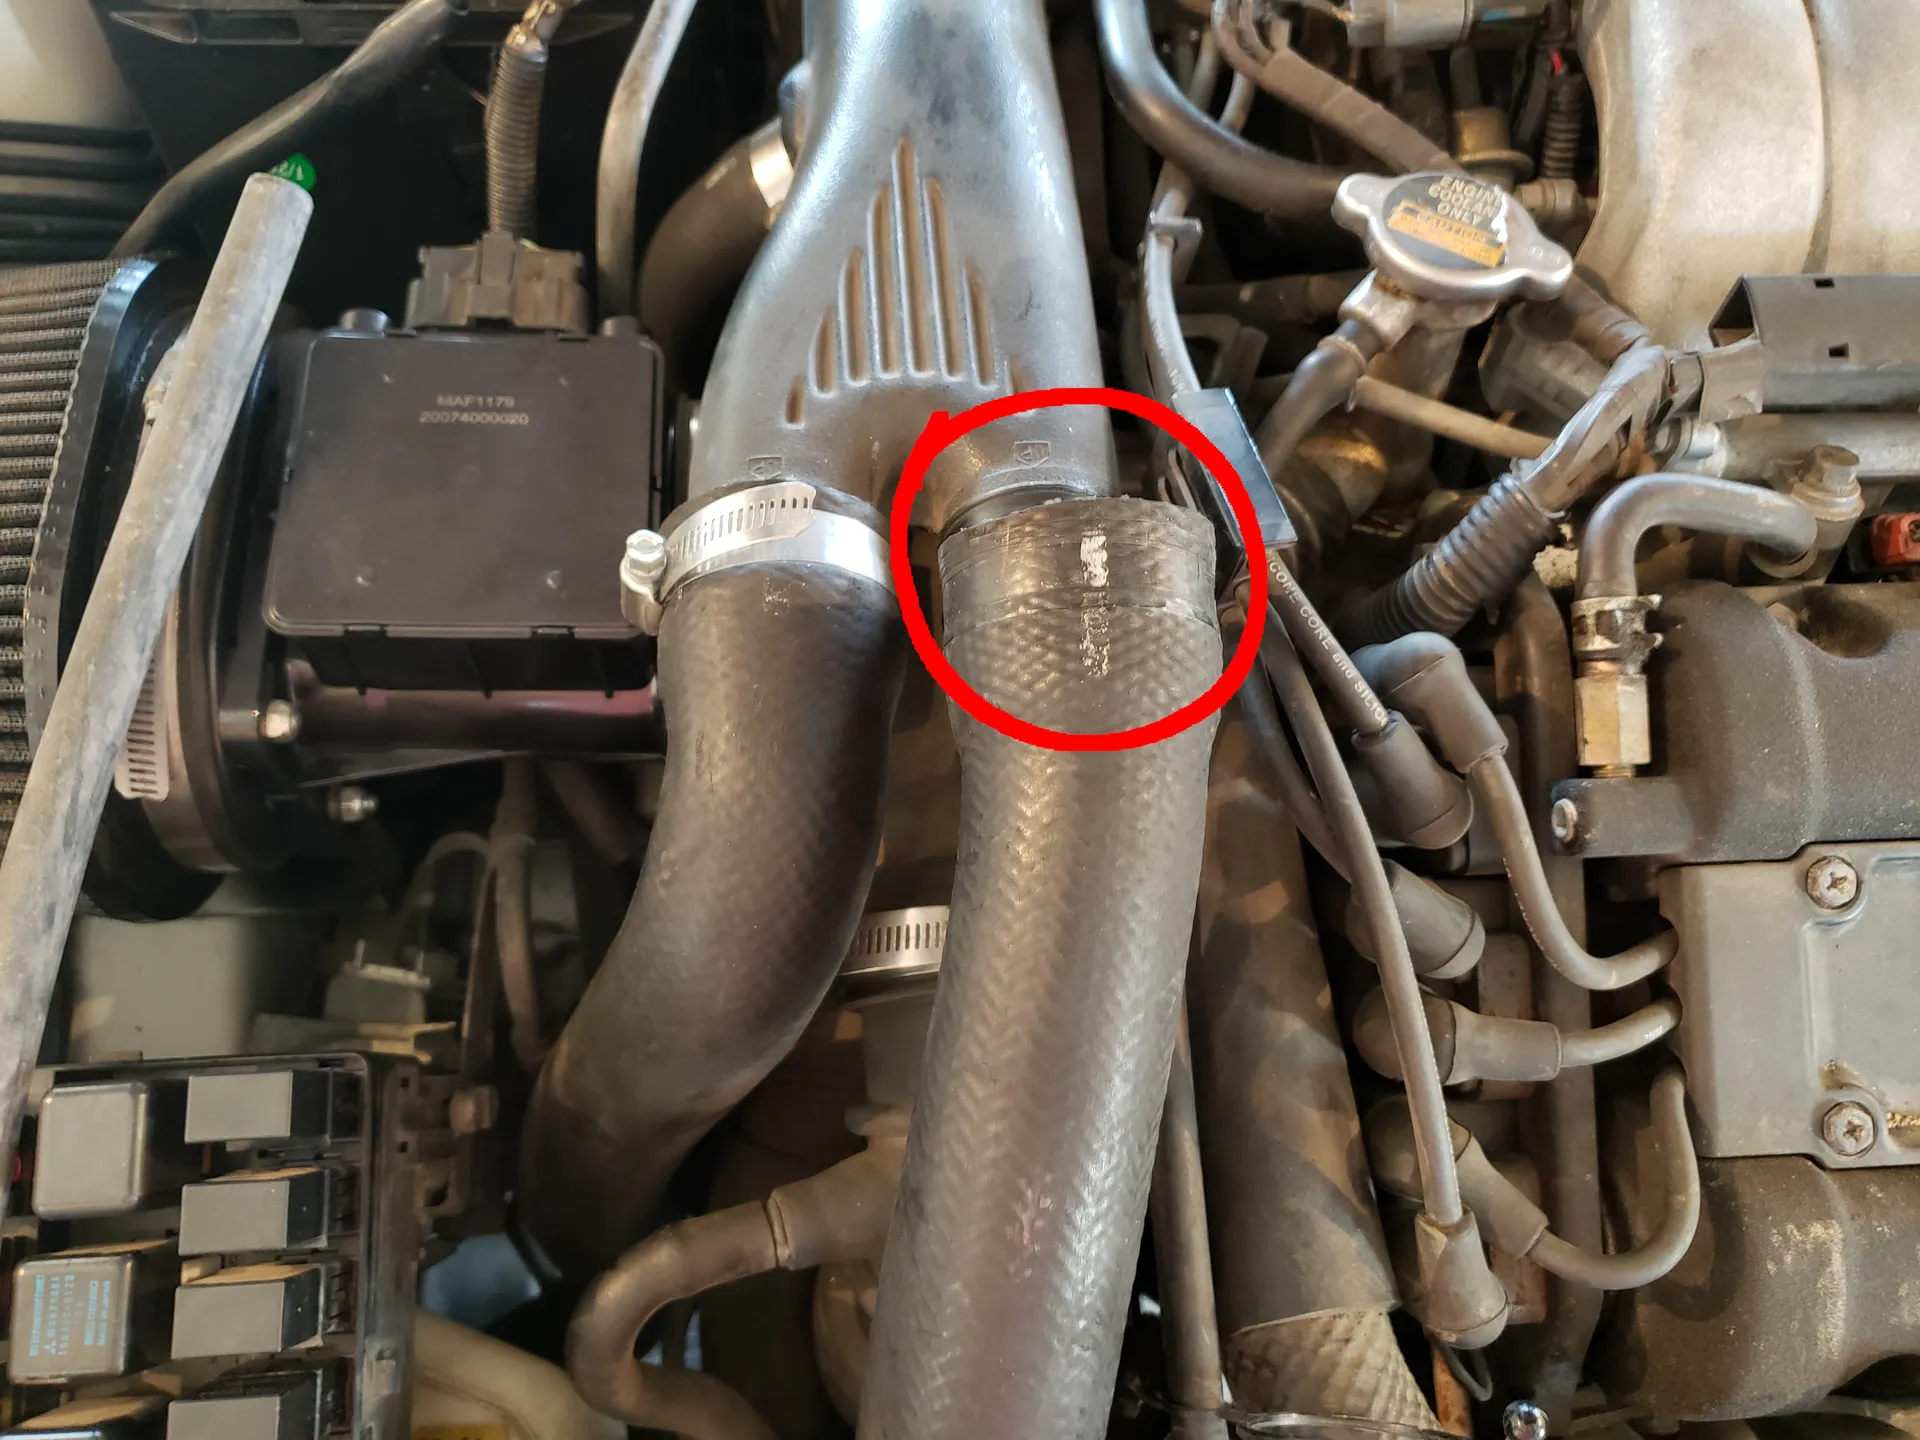
Each of these bolts will be underlined in the step where they are removed so it is clear where the new bolts should go. Which fan is the radiator fan?There are two fans attached to the radiator of the car. The one we are interested in, the radiator fan, is the one on the passenger side of the vehicle. The driver’s side fan is the condenser fan. Luckily, the radiator fan can be removed without taking too many other parts off. 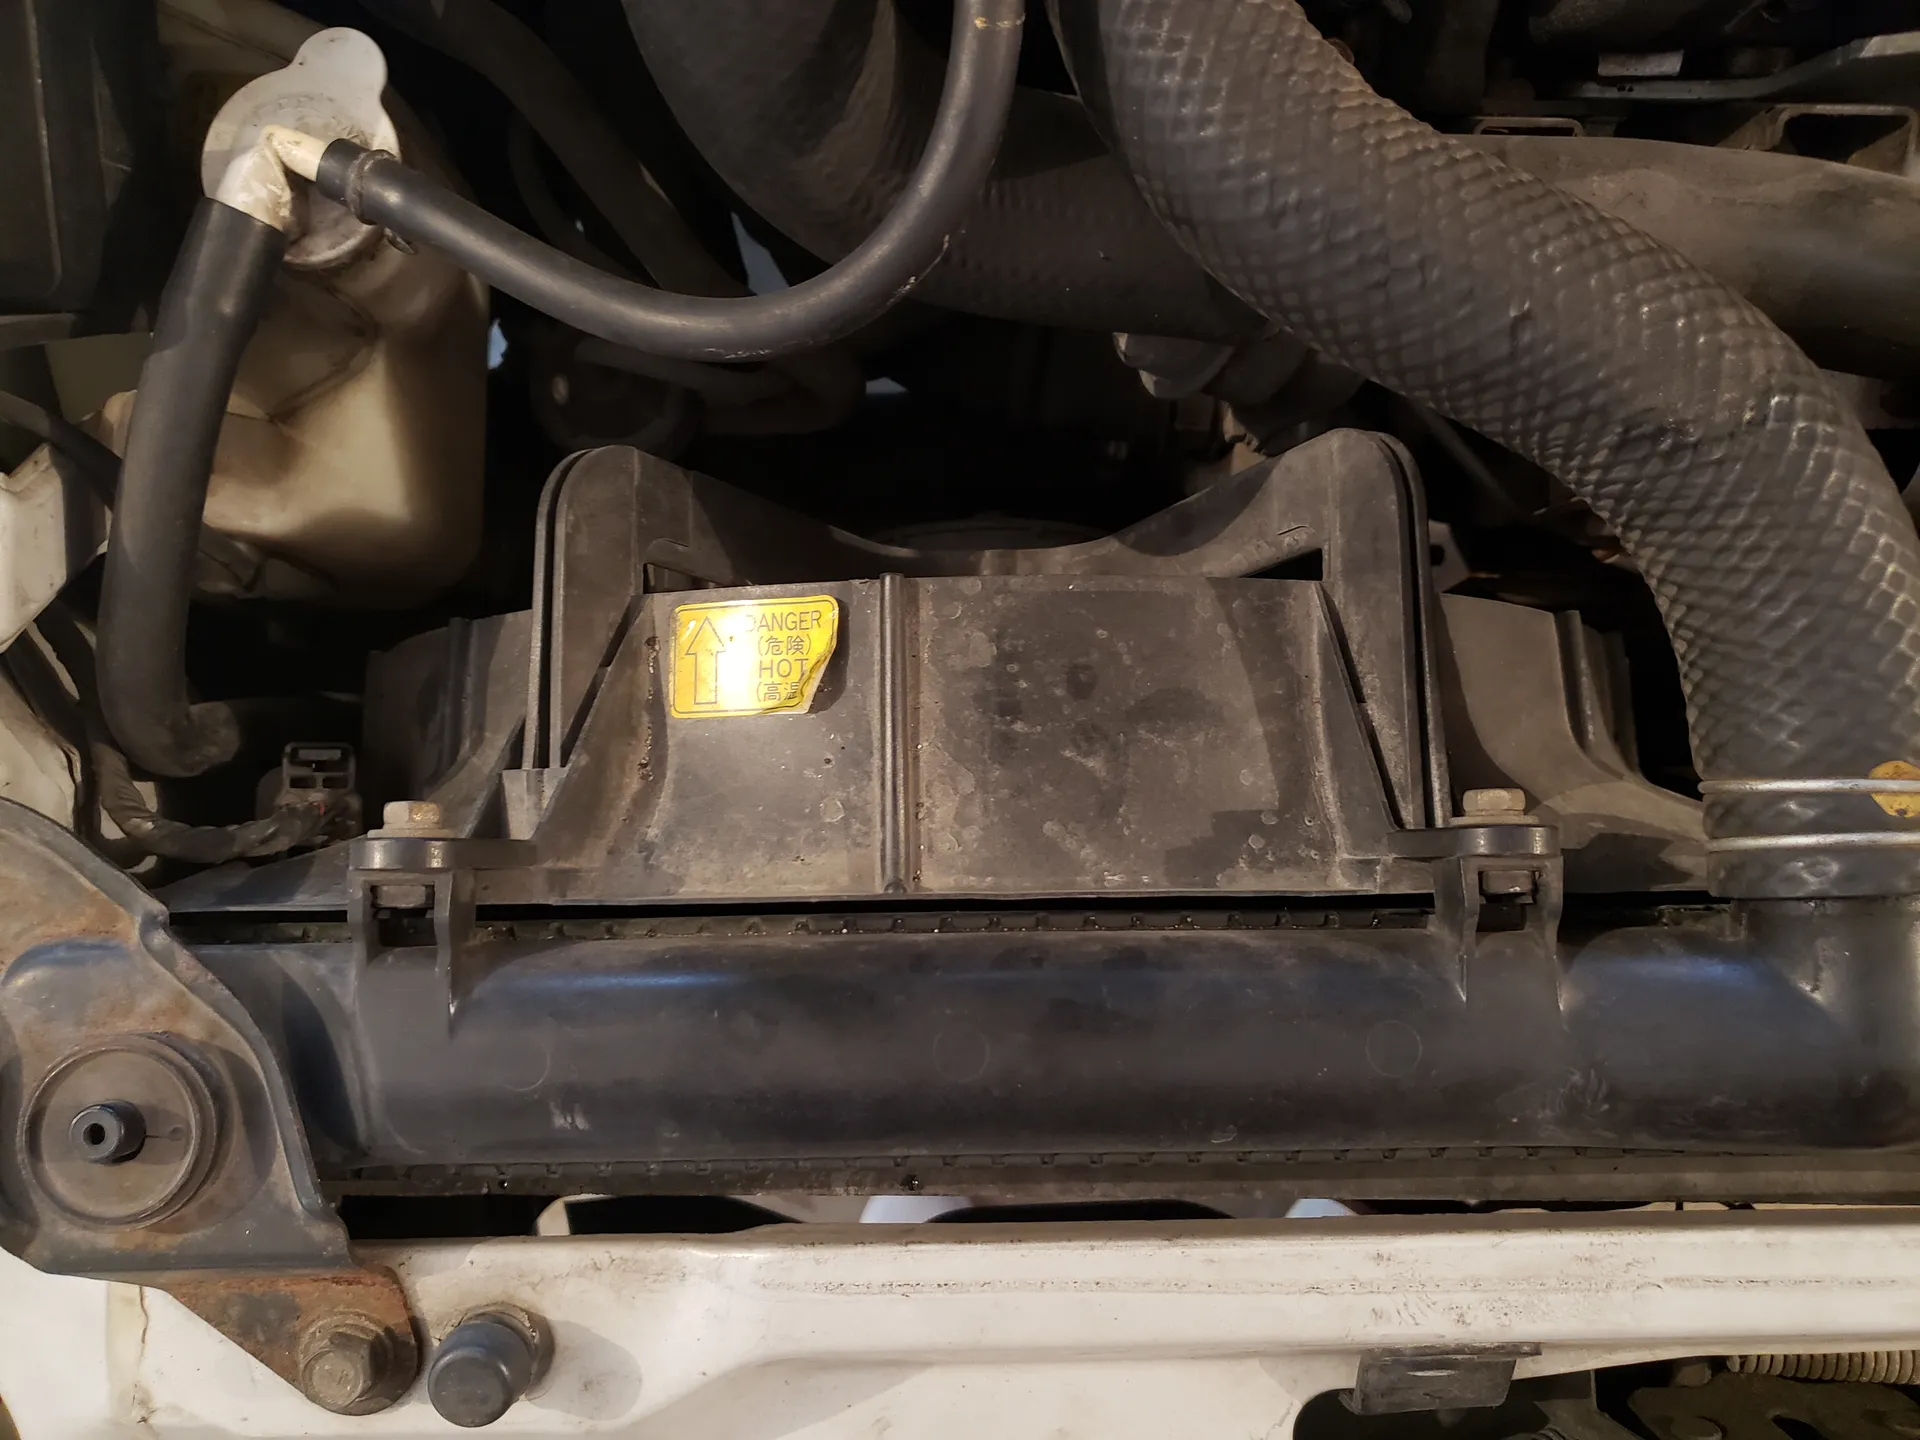 Step 1: Loosen top mounting boltsThere are two 10mm fan shroud support bolts holding the radiator fan to the radiator fan. A socket can easily be used to remove these bolts. 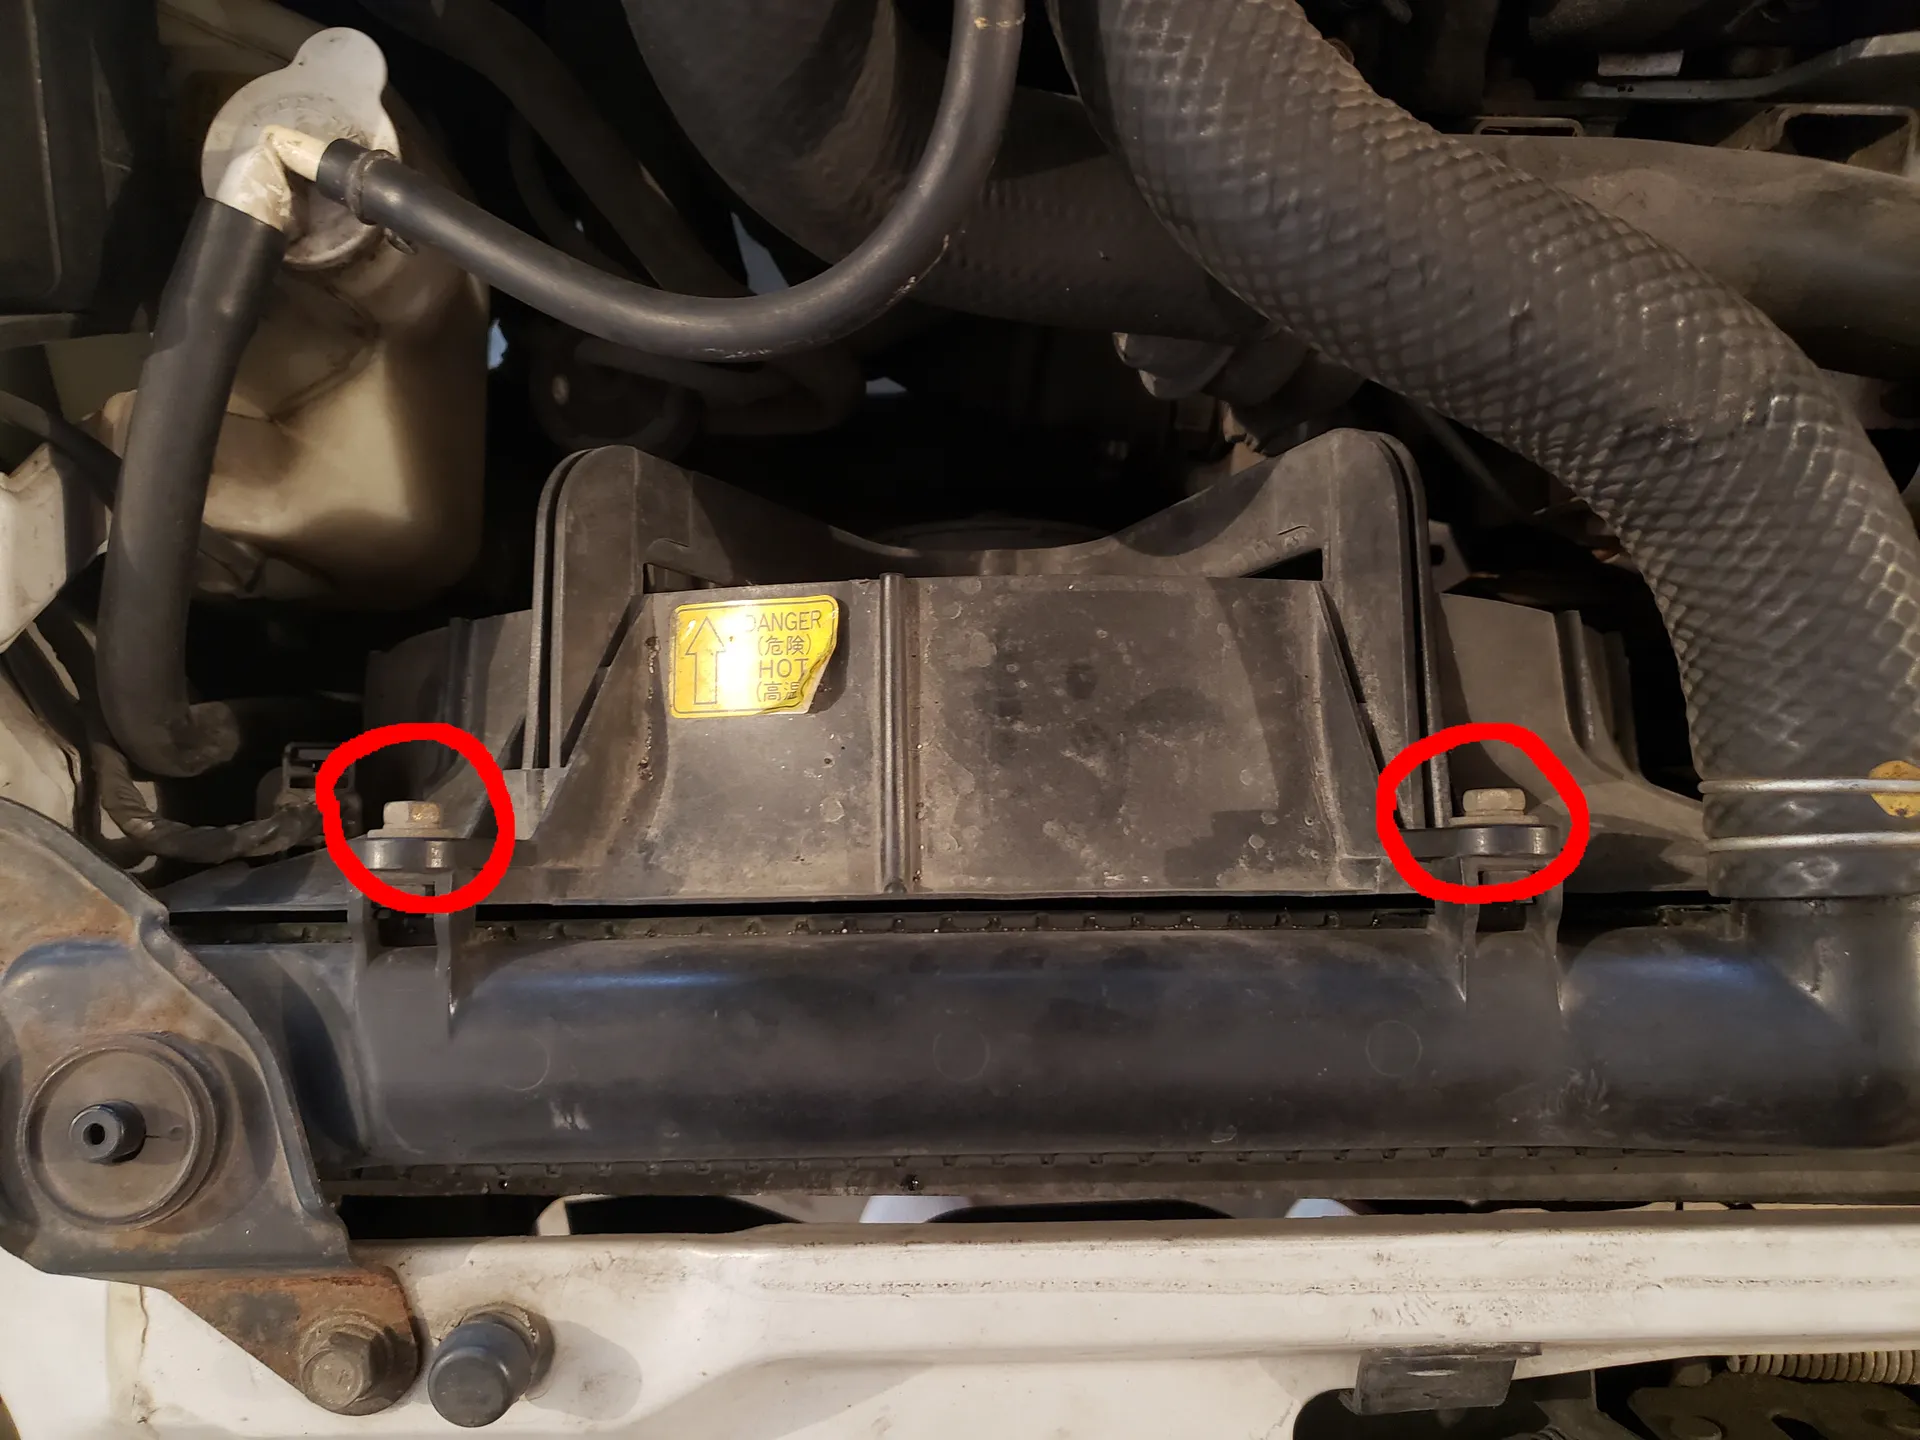 Step 2: Remove radiator hoses and support bracketIn order to get some more room in the engine bay to help pull out the radiator fan, some of the radiator hoses can be temporarily removed. Loosen the hose connector to the hose coming out of the top of the radiator with a Phillips screwdriver or a 10mm socket, placing a towel underneath to prevent any coolant from leaking (not typical). Additionally, there are some radiator support bracket bolts holding the corner of the radiator to the frame of the car can be removed to give some extra room (see lower left of image in step 1).
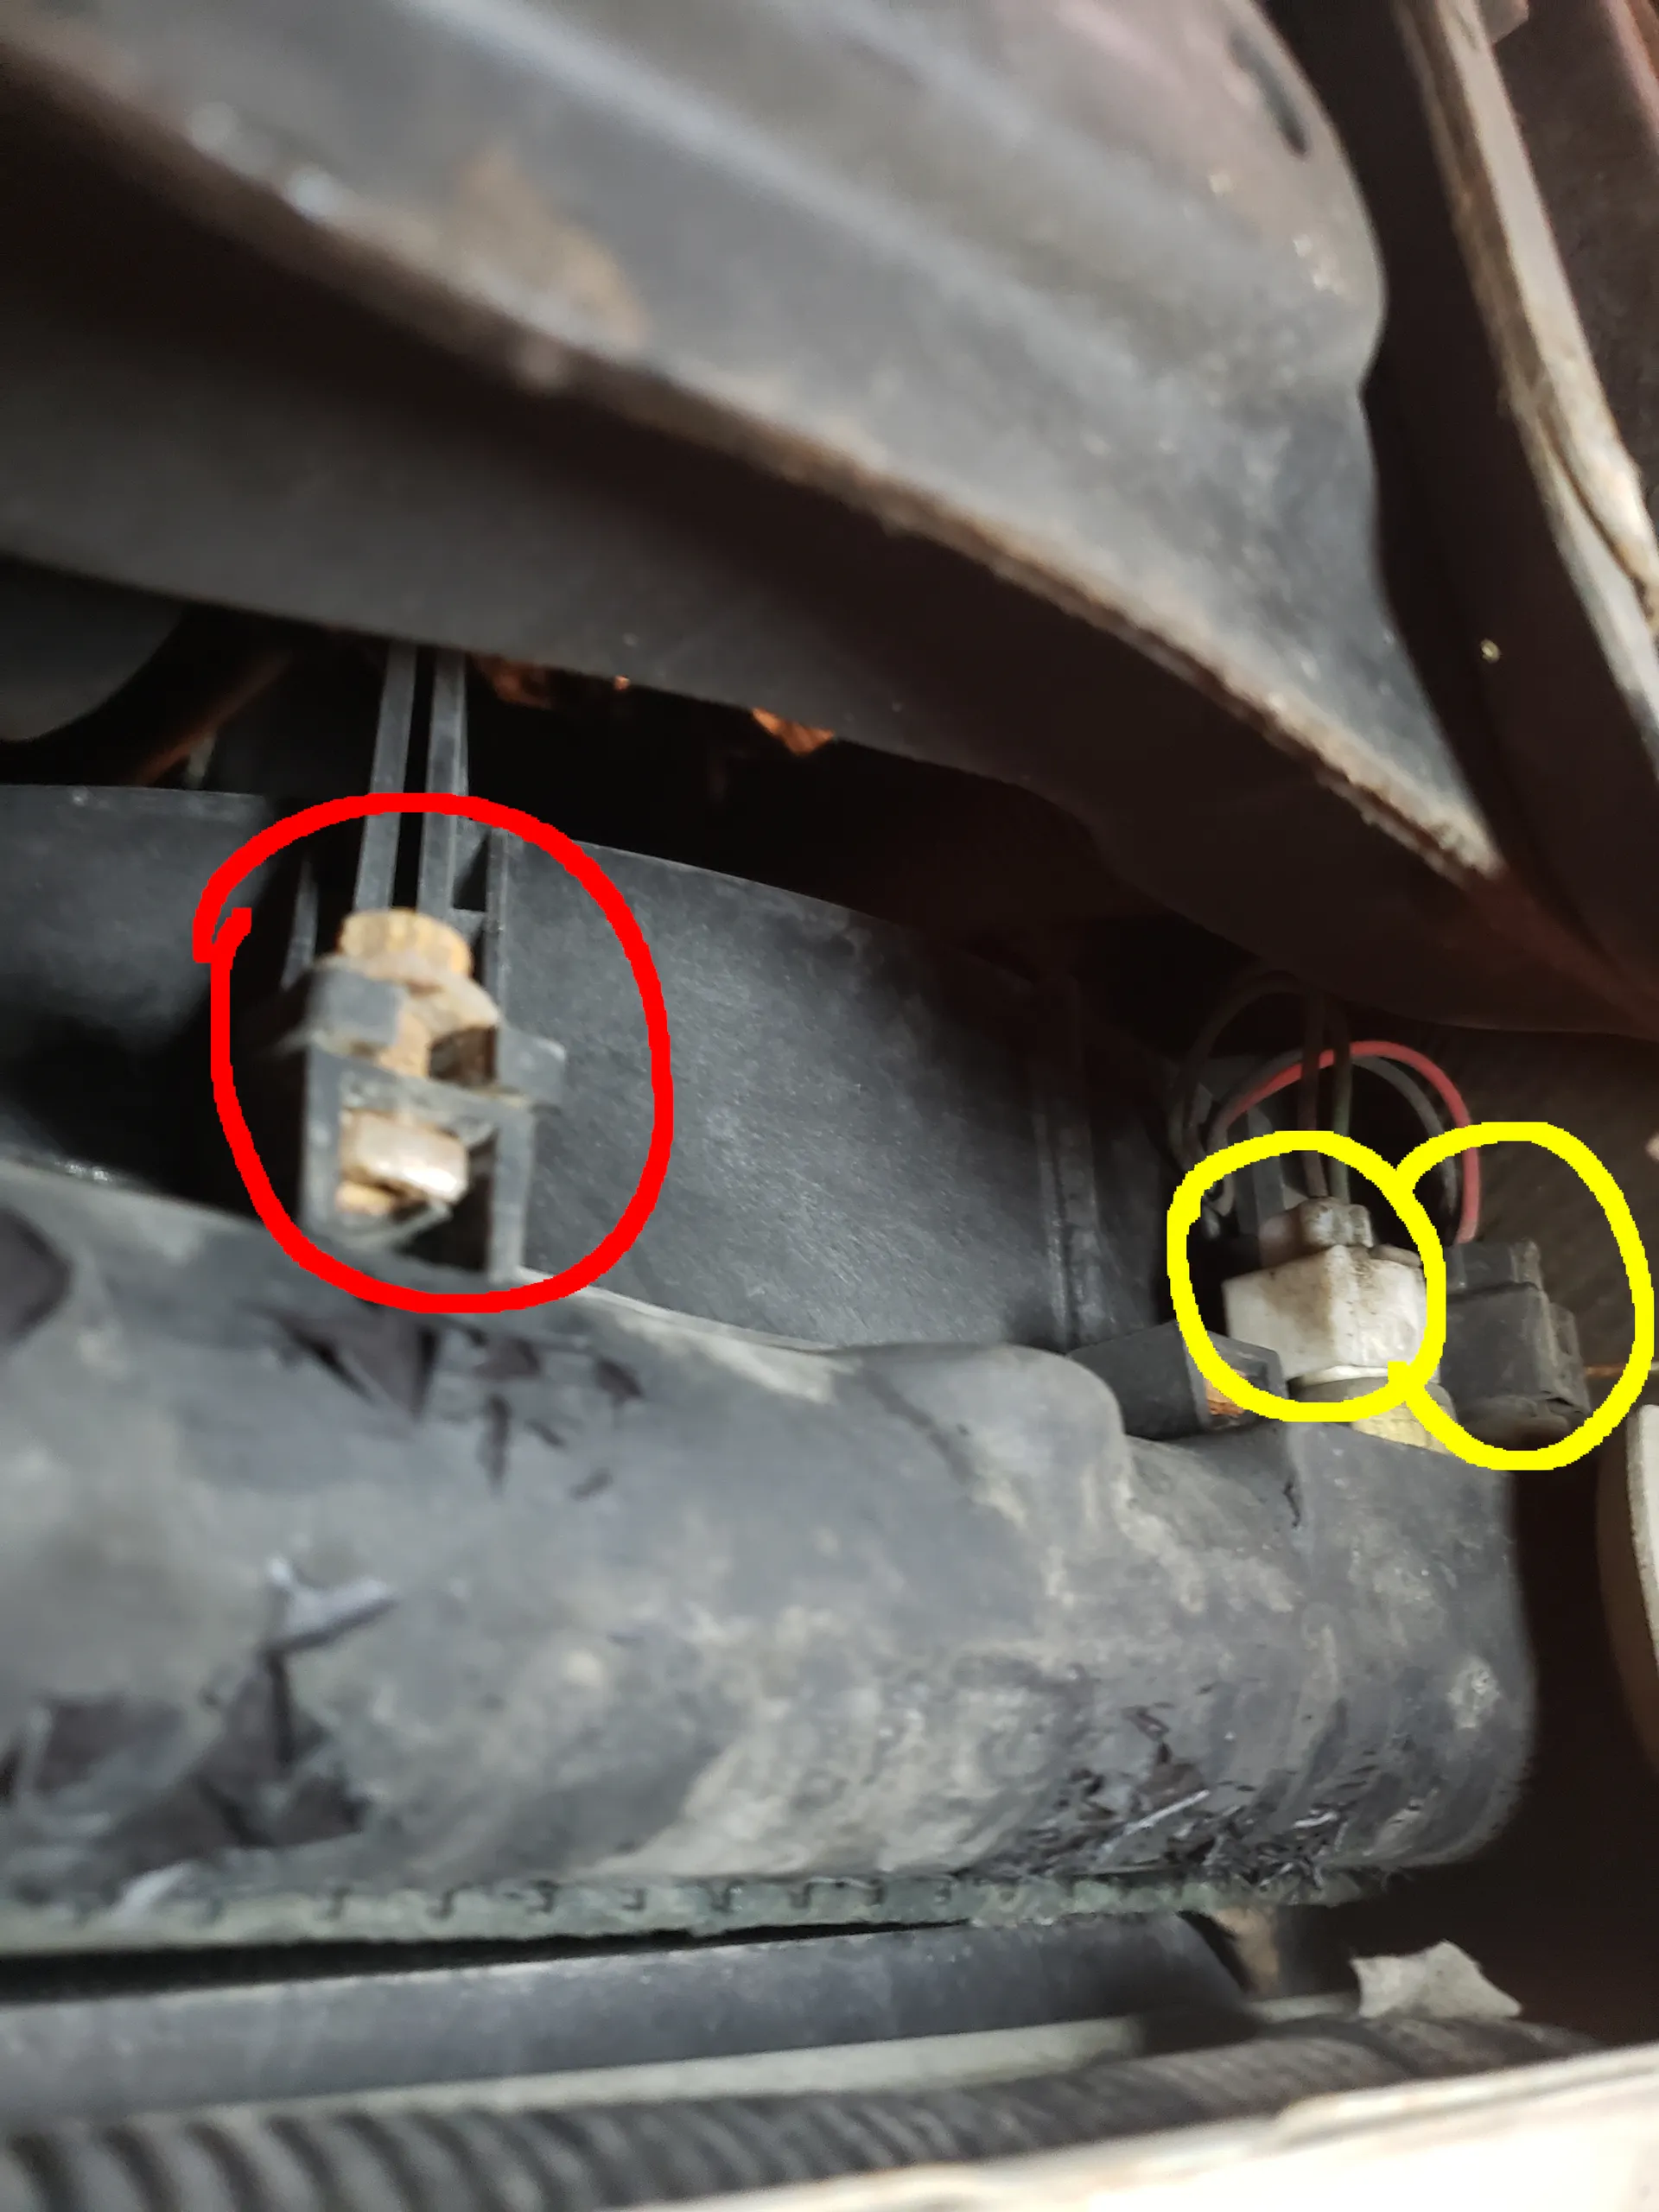
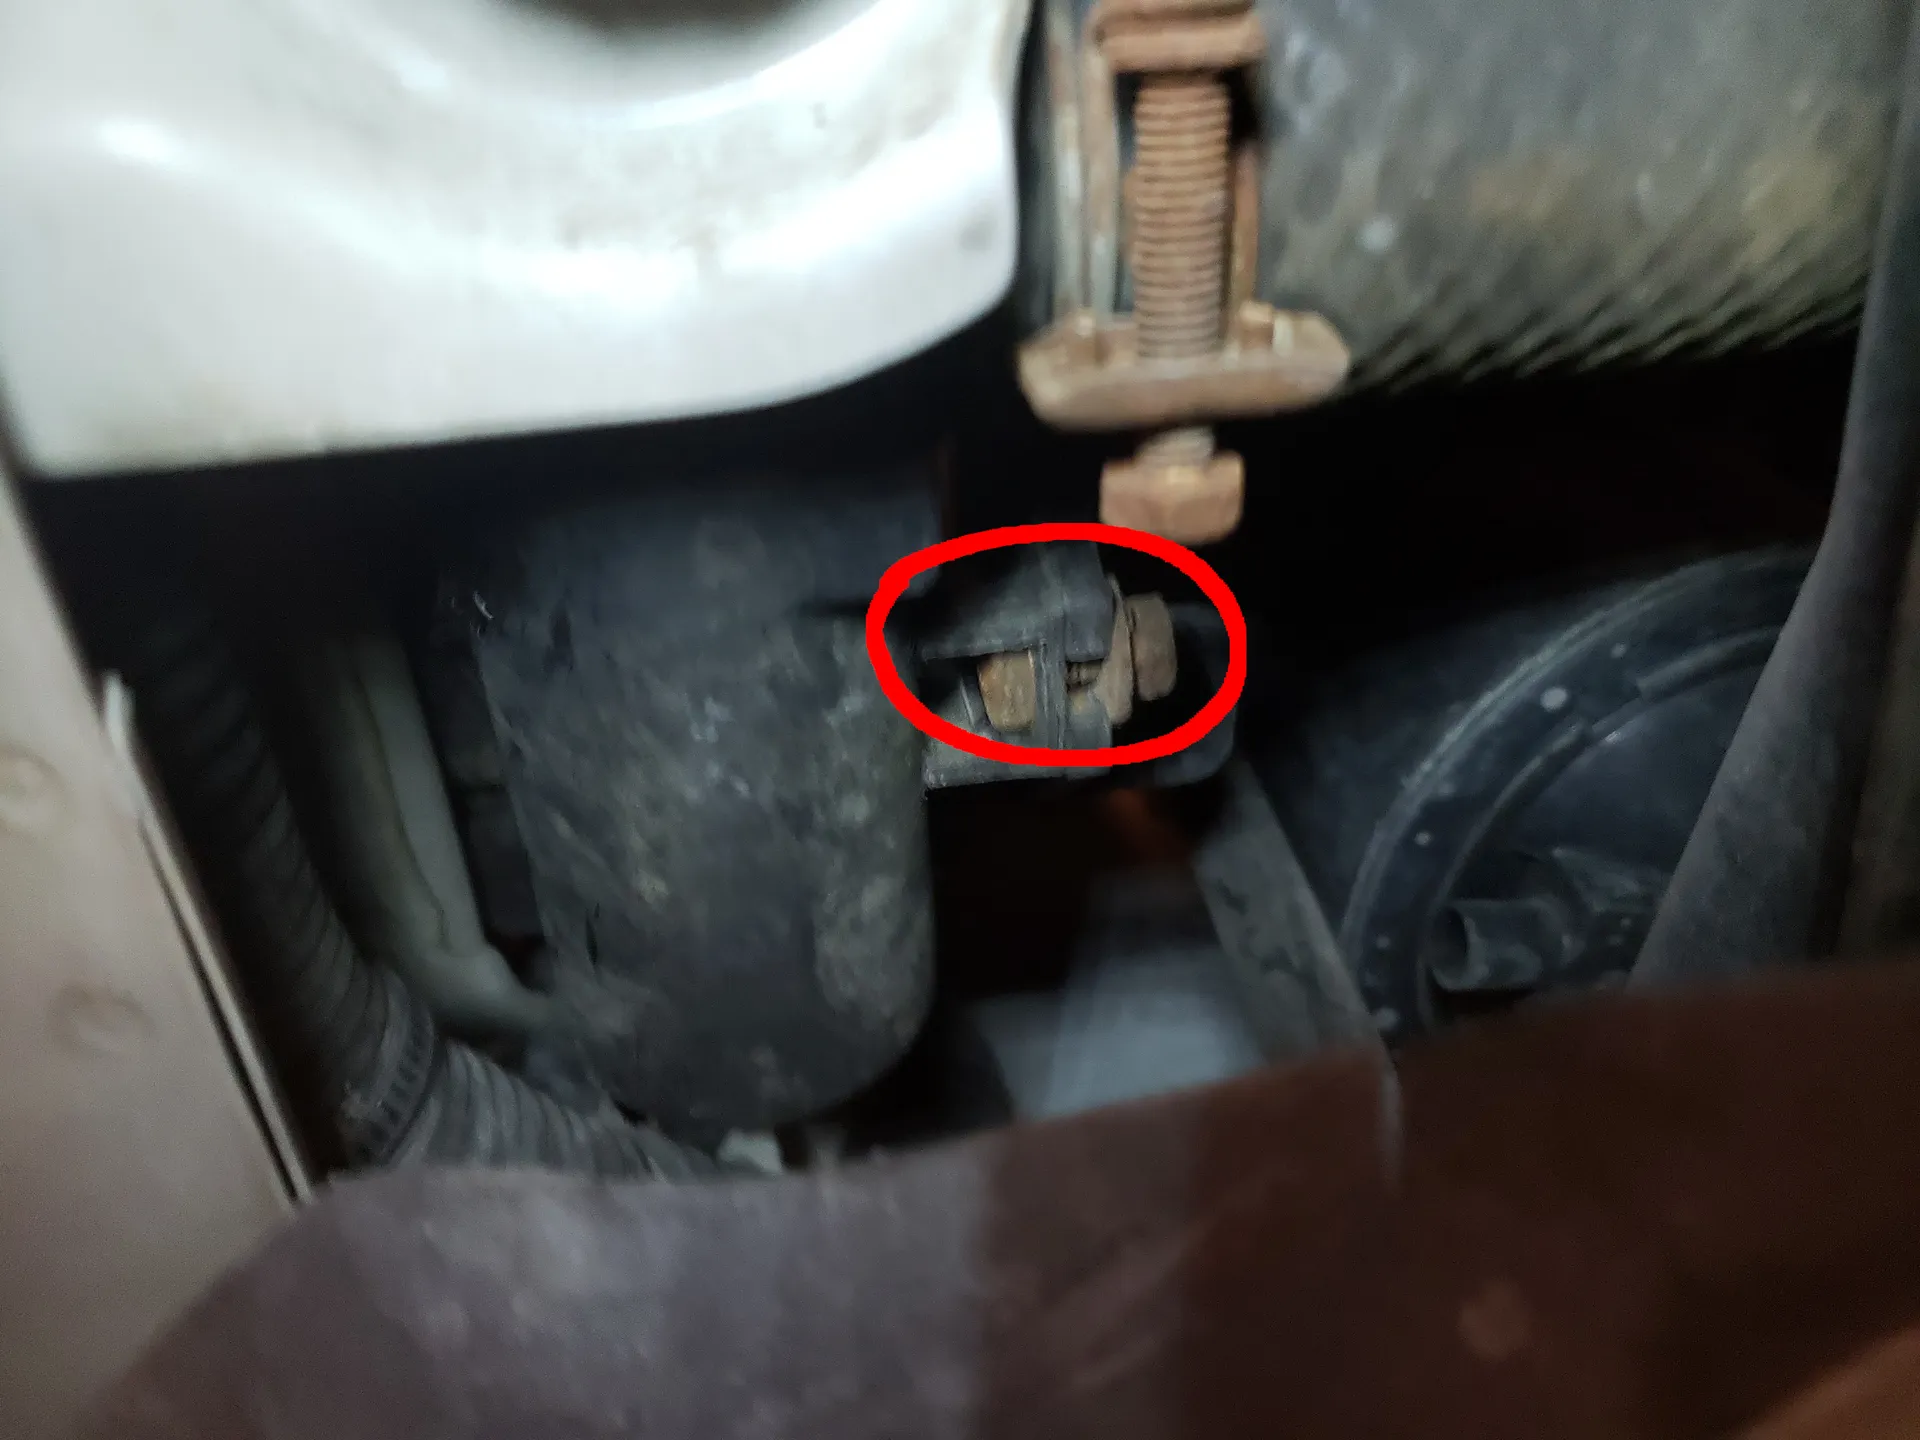
Step 3: Disconnect wiring harnessThe 6-pin wiring harness needs to be disconnected from the top of the radiator fan assembly. It is located near the edge of the car and is attached to the assembly. The clip is snug and may be difficult to remove. 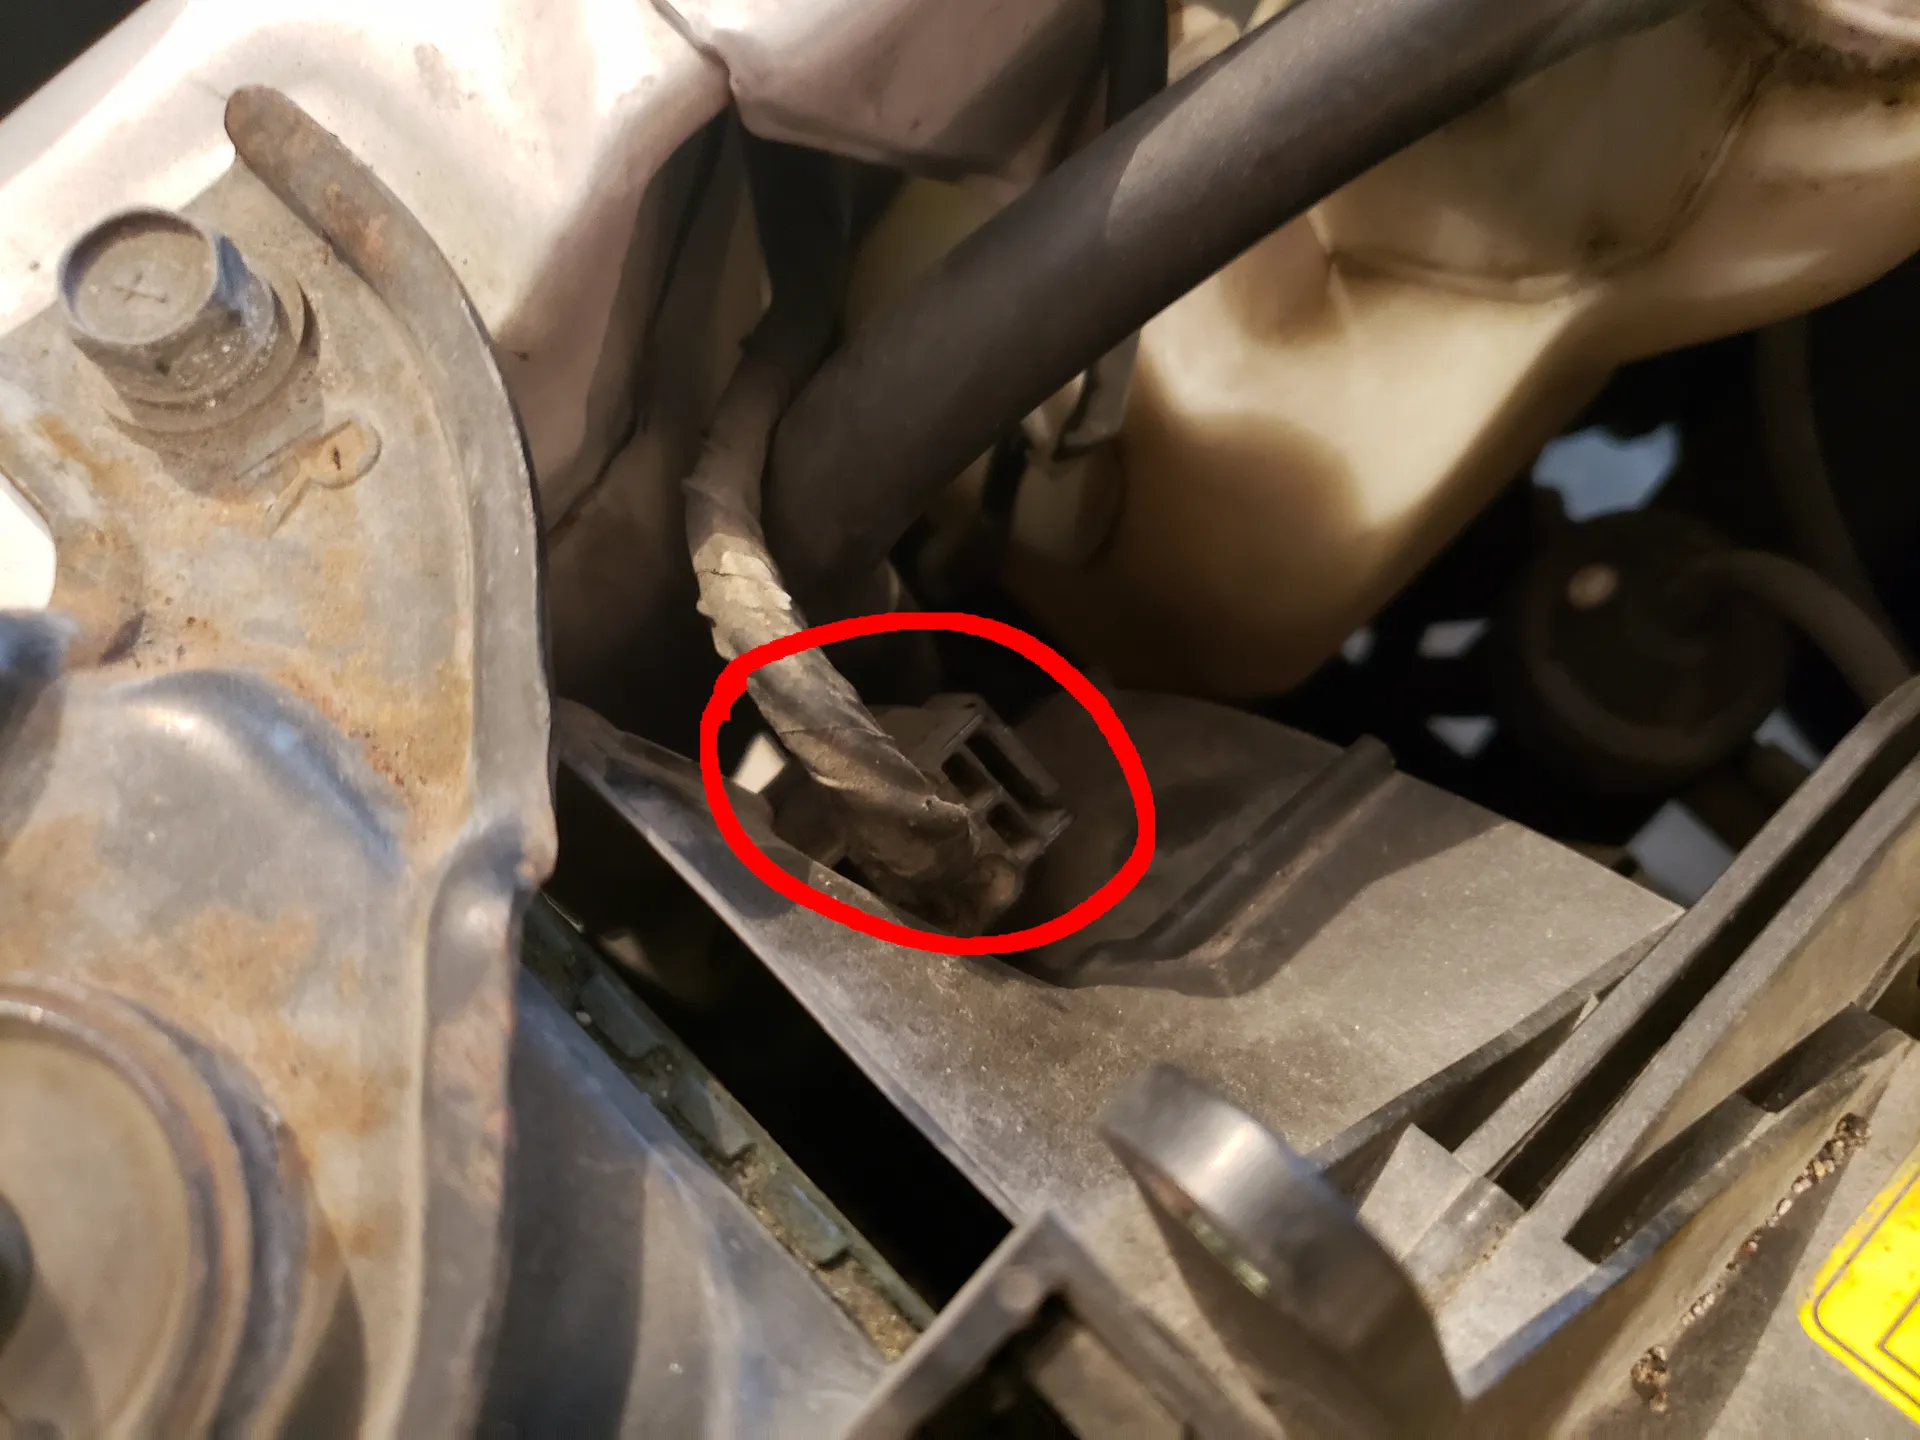 Step 4: Remove underbody plasticTo get to the lower radiator fan mounting bolts and temperature sensors, the underbody plastic needs to be removed. There are six front underbody lip bolts (12mm) near the front of the car (circled in yellow in the image below). Although they cannot be seen in the image, they are viewable from underneath. There are also five other underbody bolts (10mm) that then need to be removed. Once all of these bolts are removed, the underbody plastic should fall from the bottom of the car. 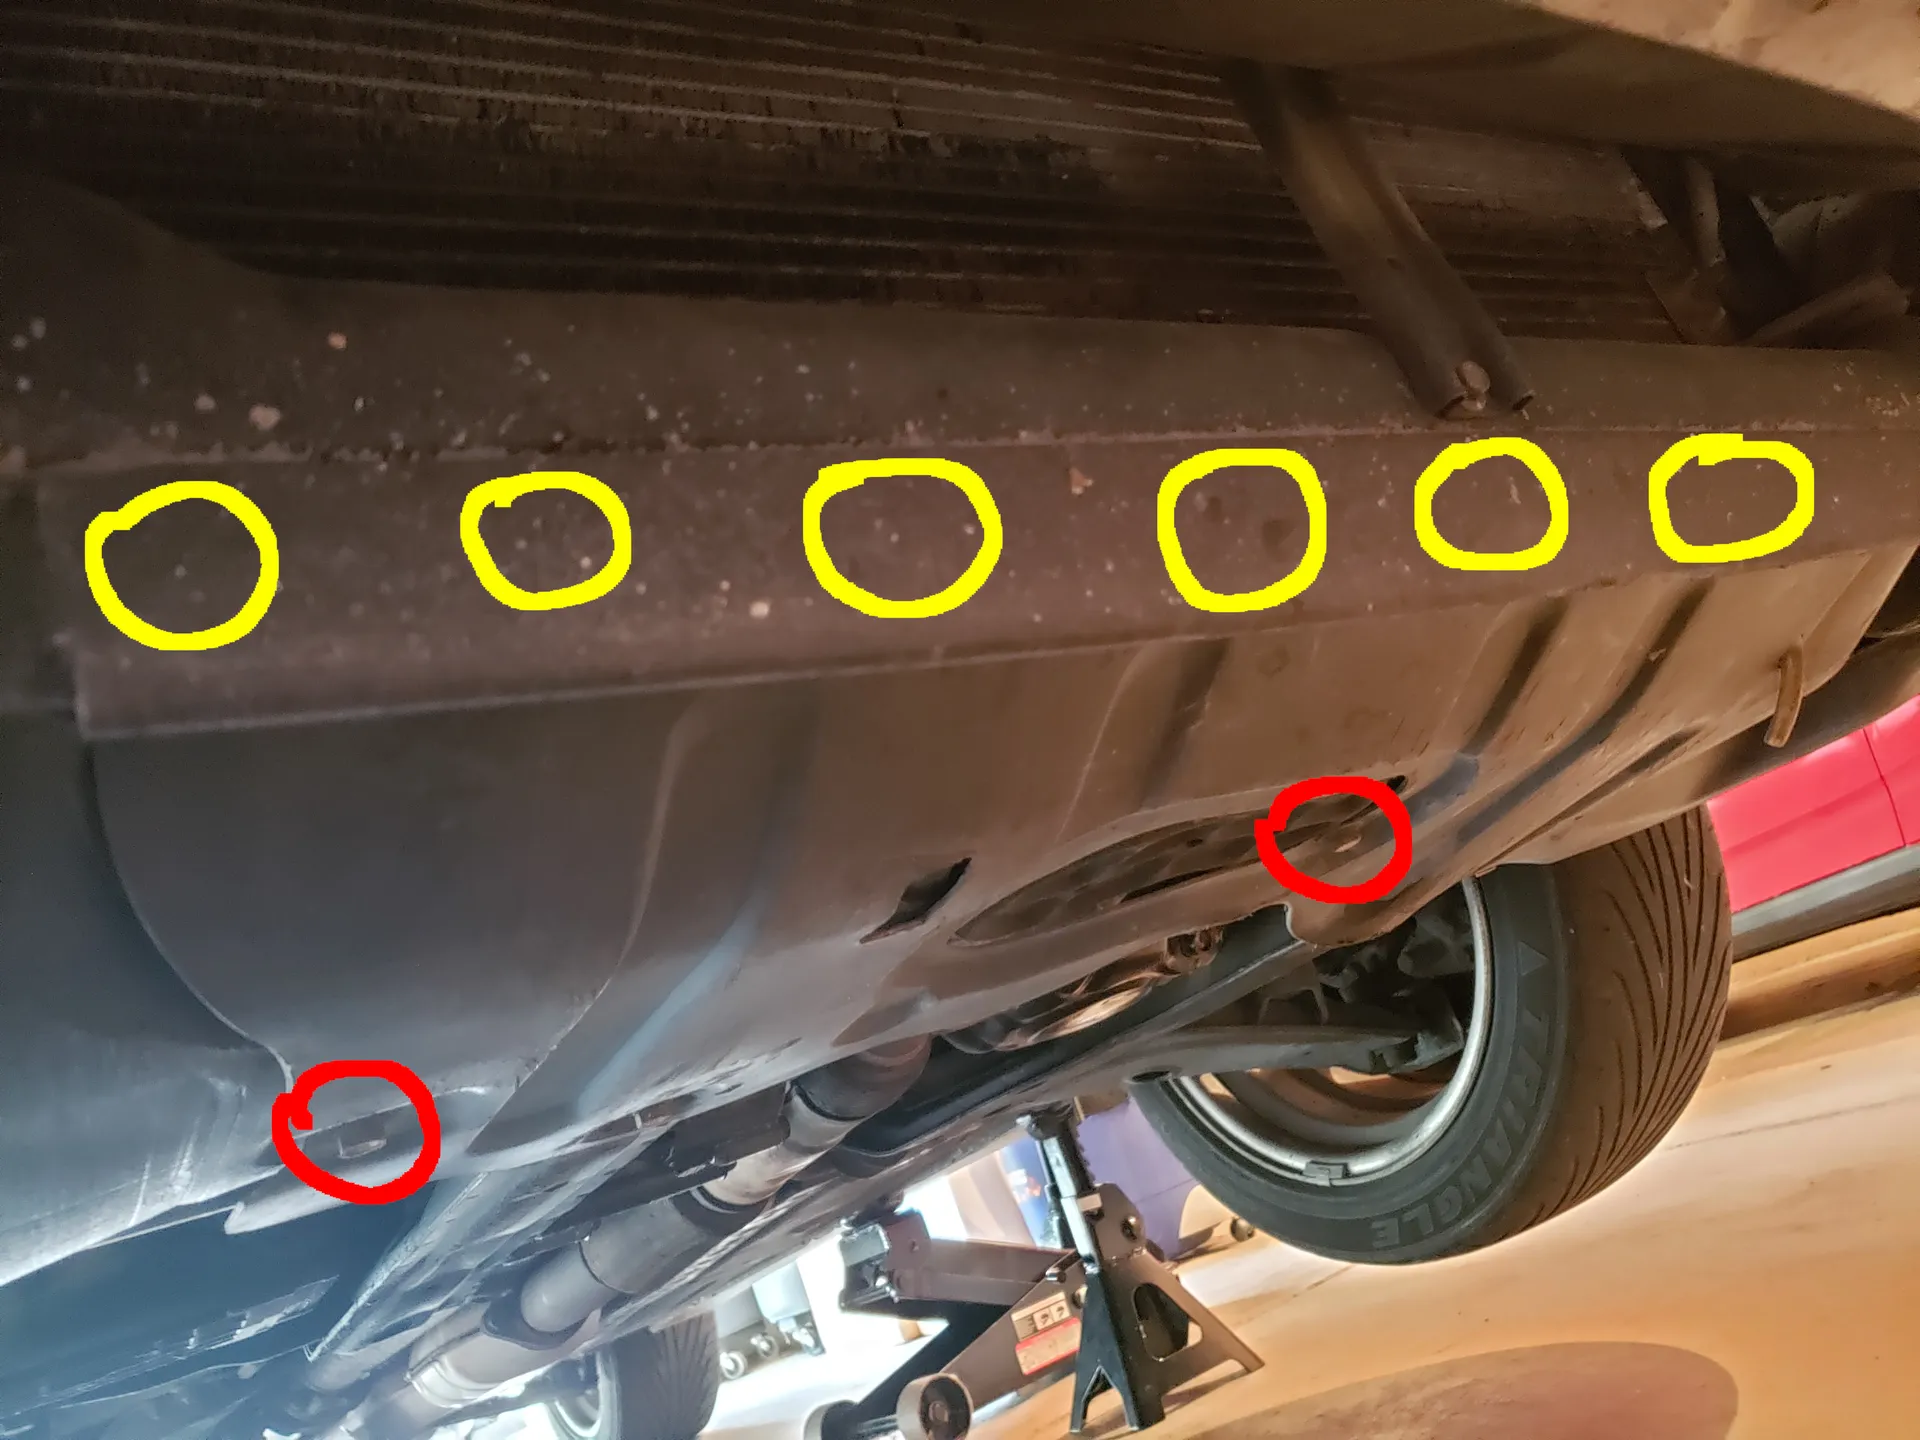 Step 5: Remove bottom support bolts and temperature sensor plugsOnce the underbody plastic is removed, the bottom fan shroud support bolts (red in images below) and temperature sensor wiring harness plugs can be accessed and removed. The two bolts can be removed with a 10mm socket, although a wrench may be easier to fit in the tight space. Additionally, the two temperature sensors need to be disconnected from the radiator (up to 1993 model year). There is a black and white wiring harness plug that need to be disconnected (circled in yellow in image below).
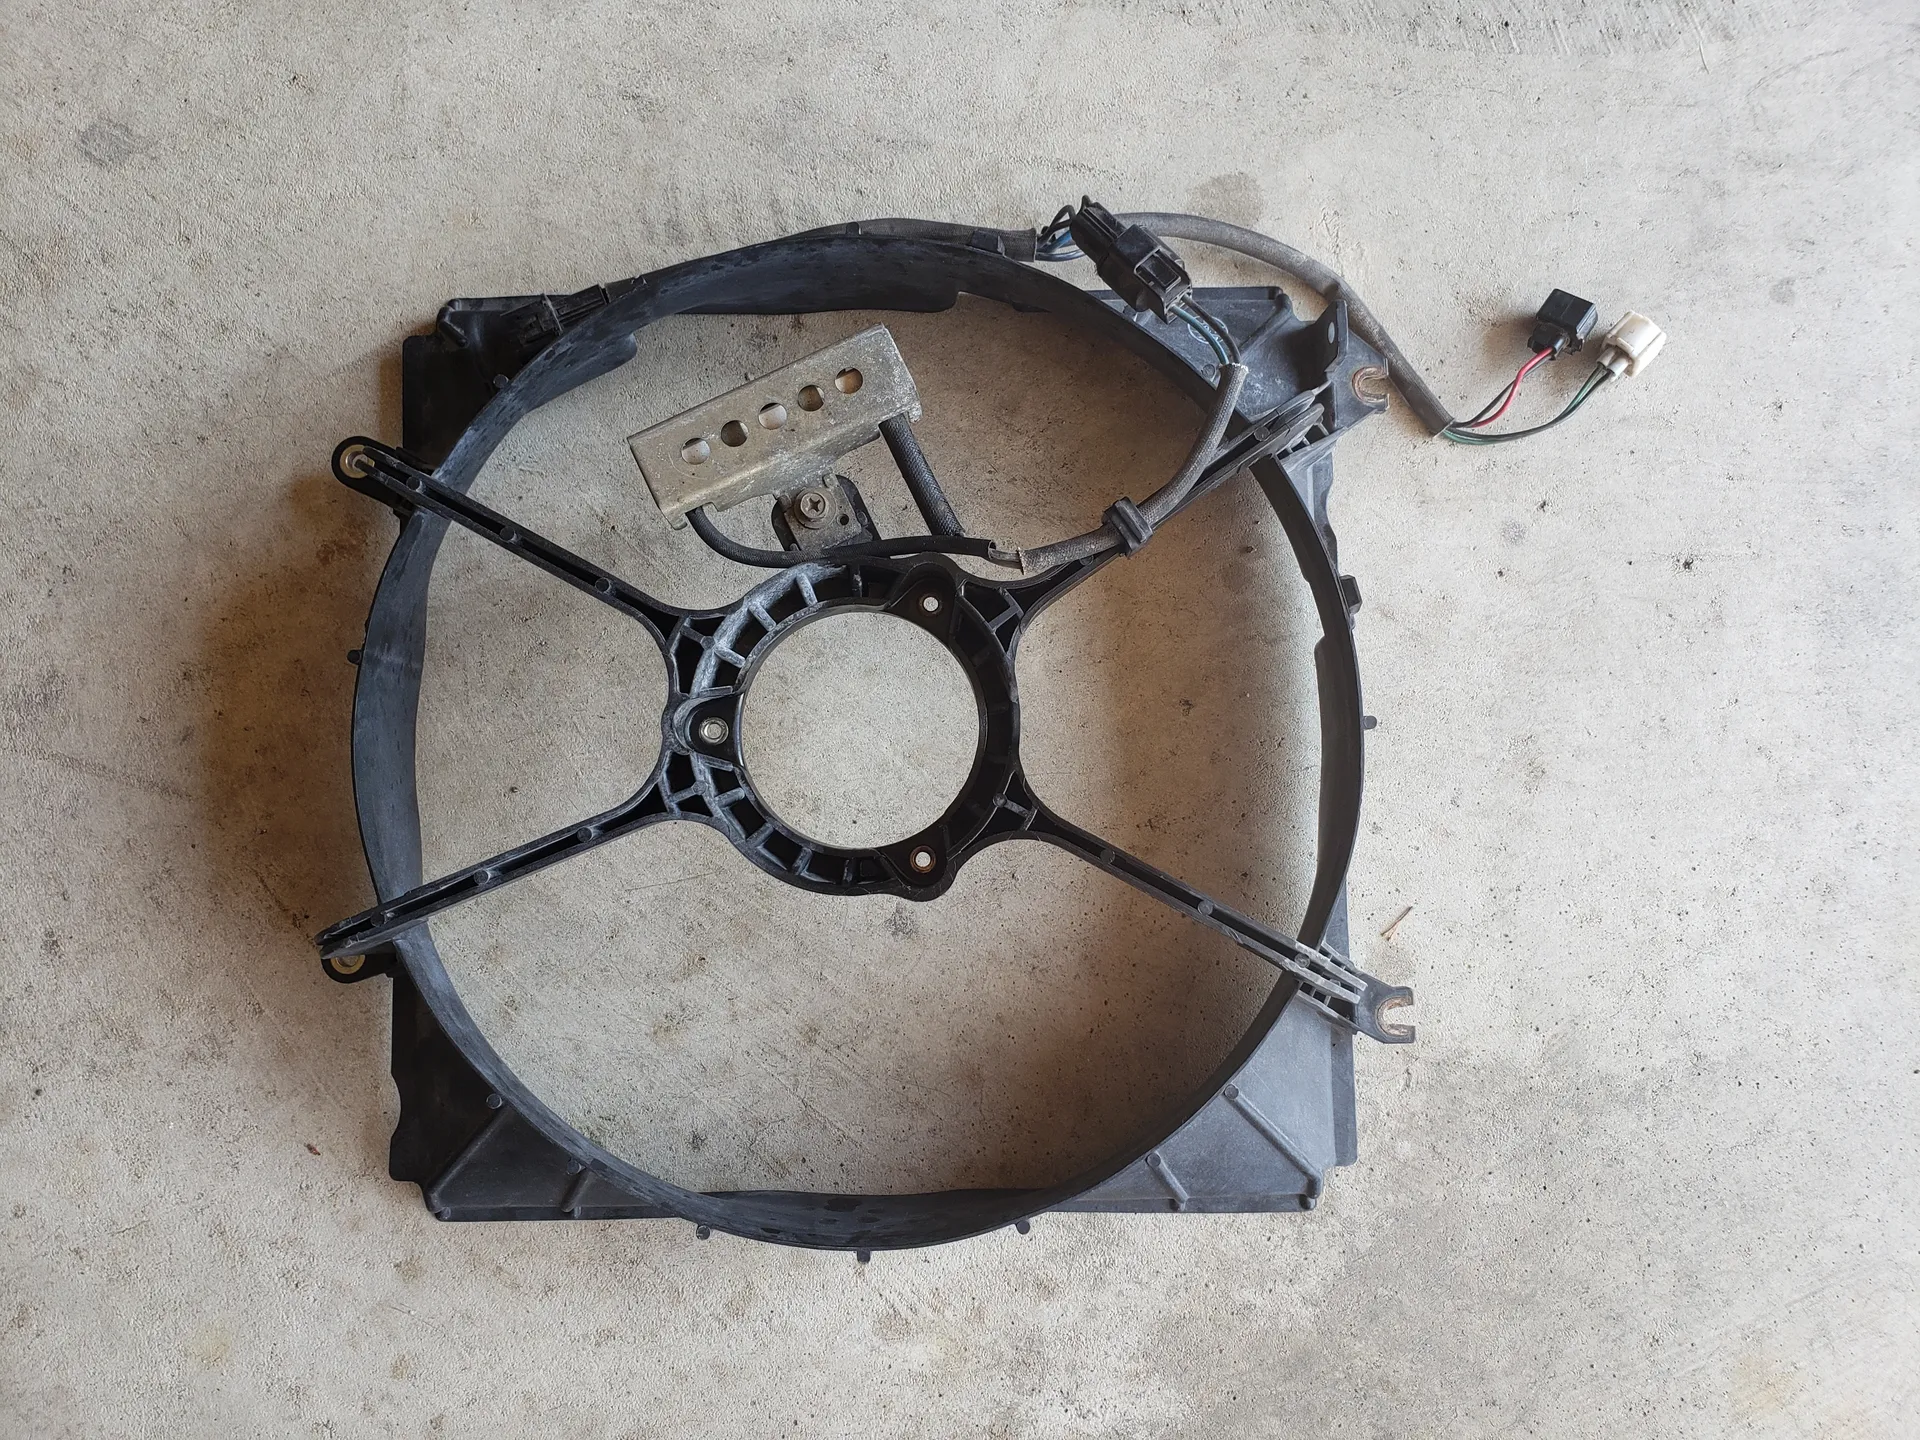
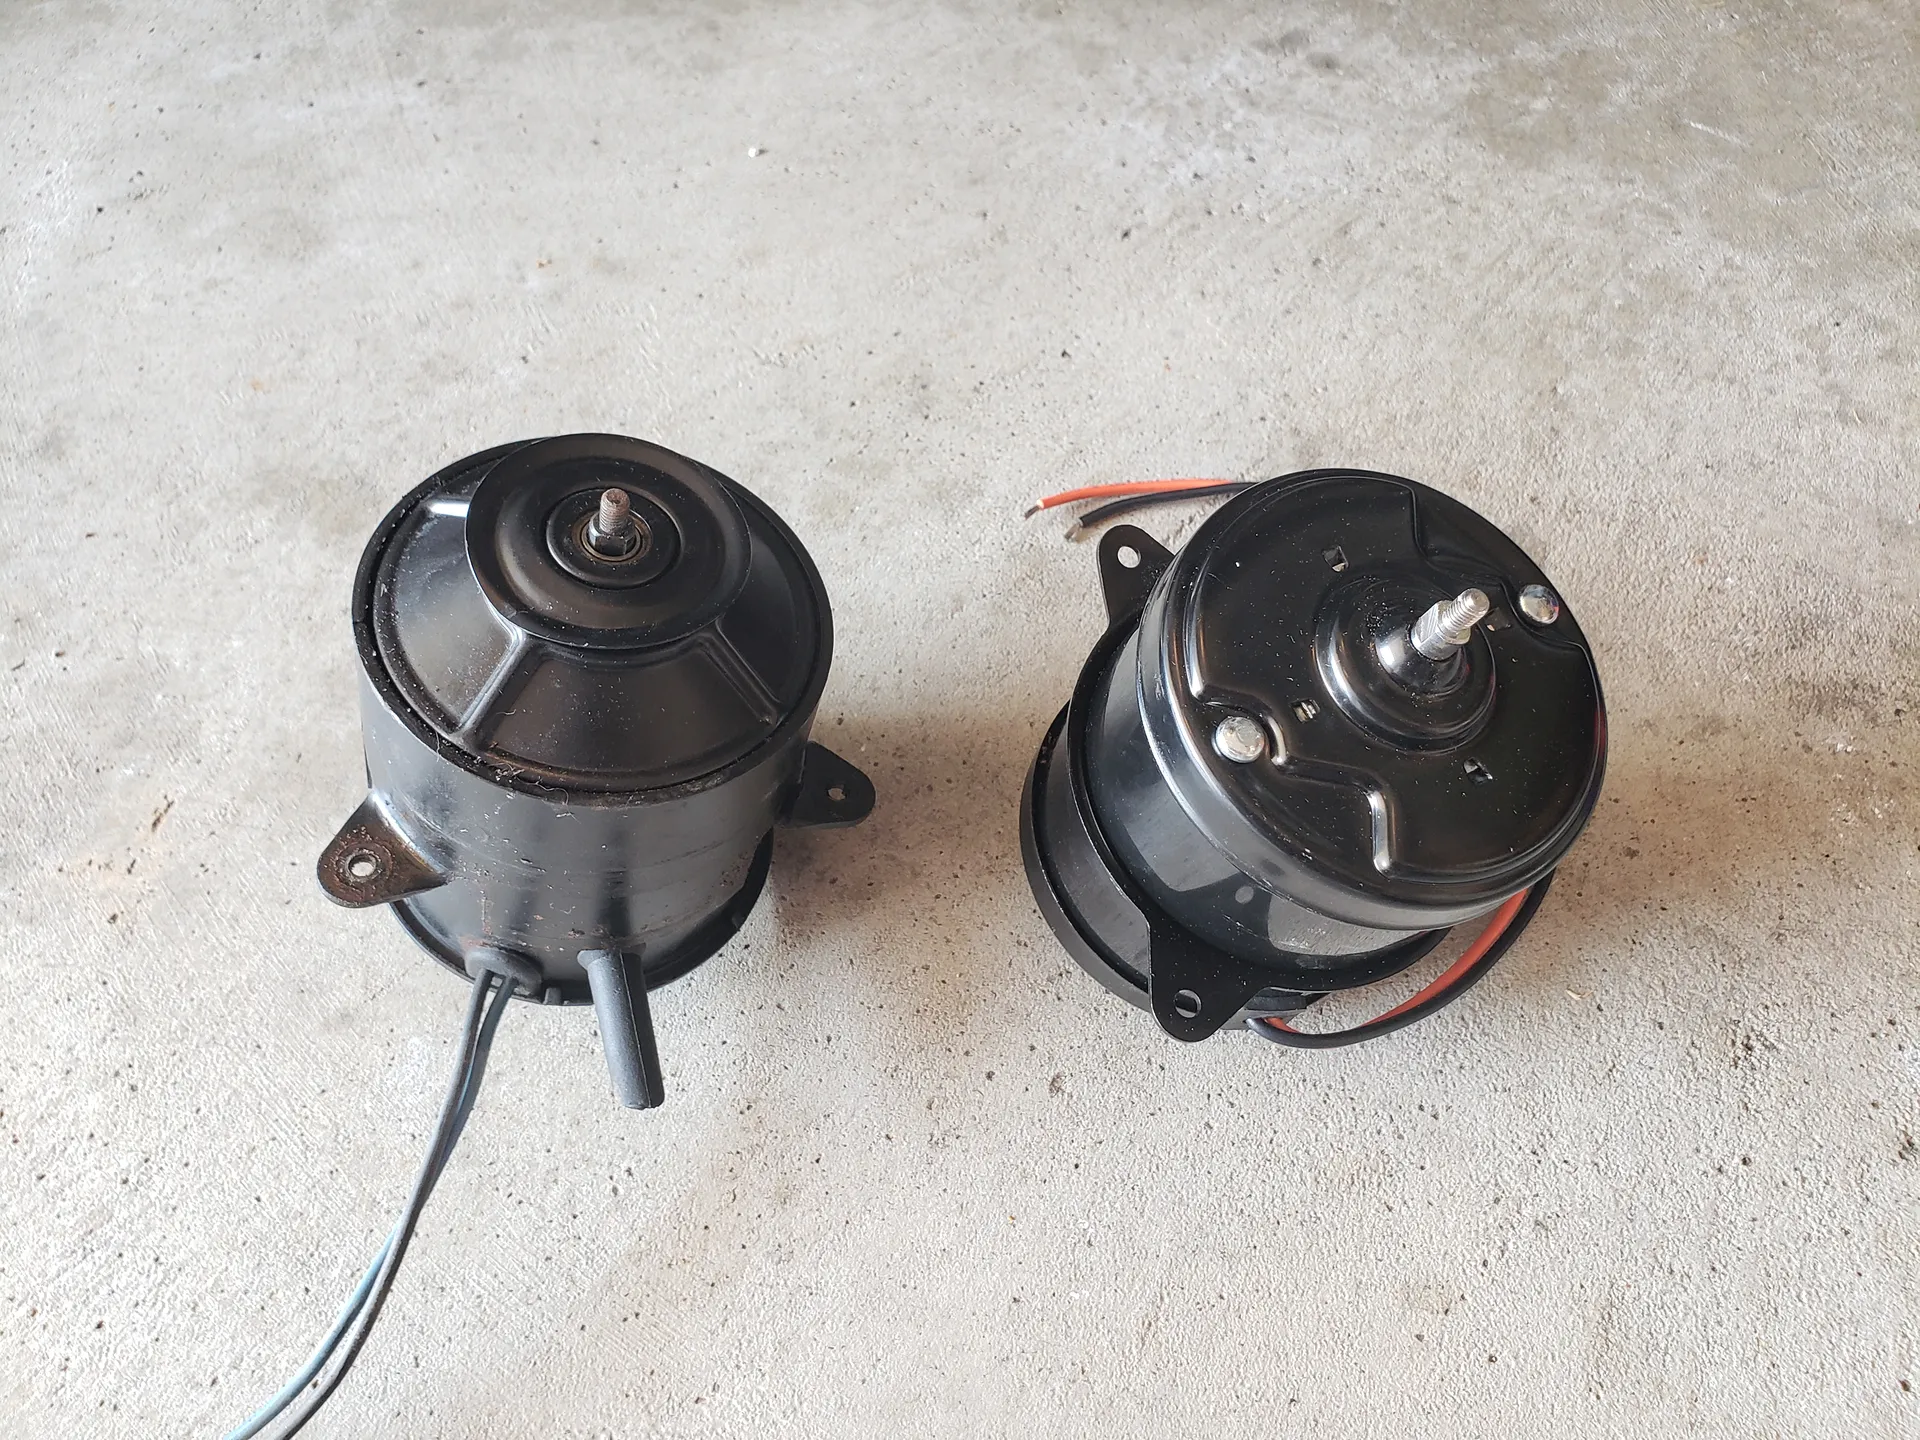
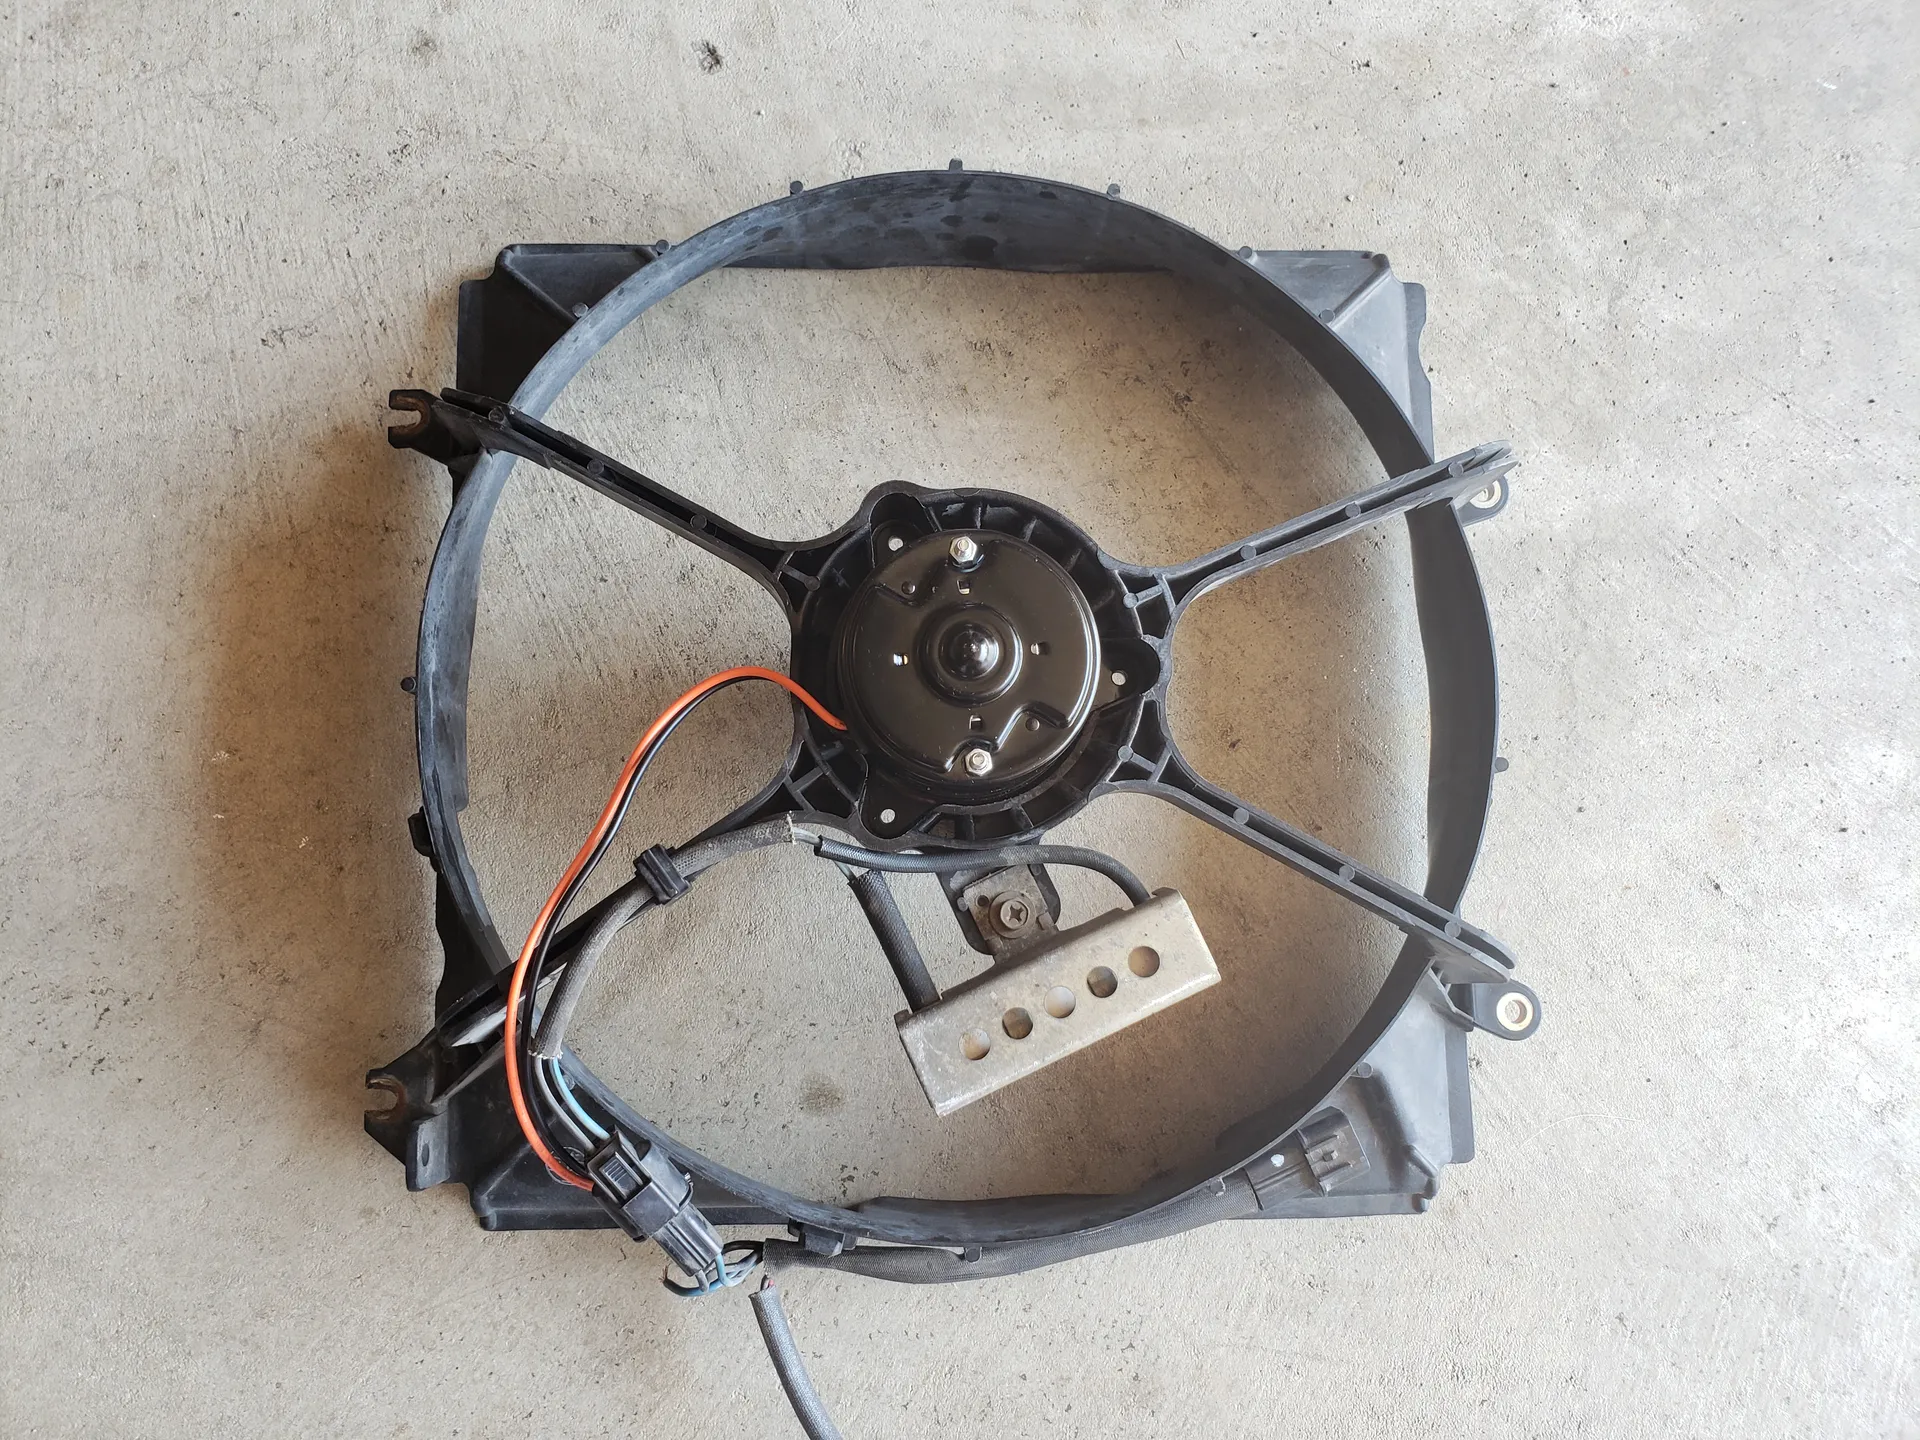
Step 6: Remove radiator fan assemblyOnce all the bolts and wiring harnesses are removed, the fan assembly should be loose in the engine bay. It can carefully be removed by pulling it up from the top of the engine bay. It may be difficult to squeeze out, but as long as the fan blades don’t catch and break, it should come out with some effort. Step 7: Remove fan bladesUsing an 8mm socket, the small radiator fan flange nut can be removed that holds the fan blades to the motor. Hold the blades in place while loosening it or the blades will spin with the socket. 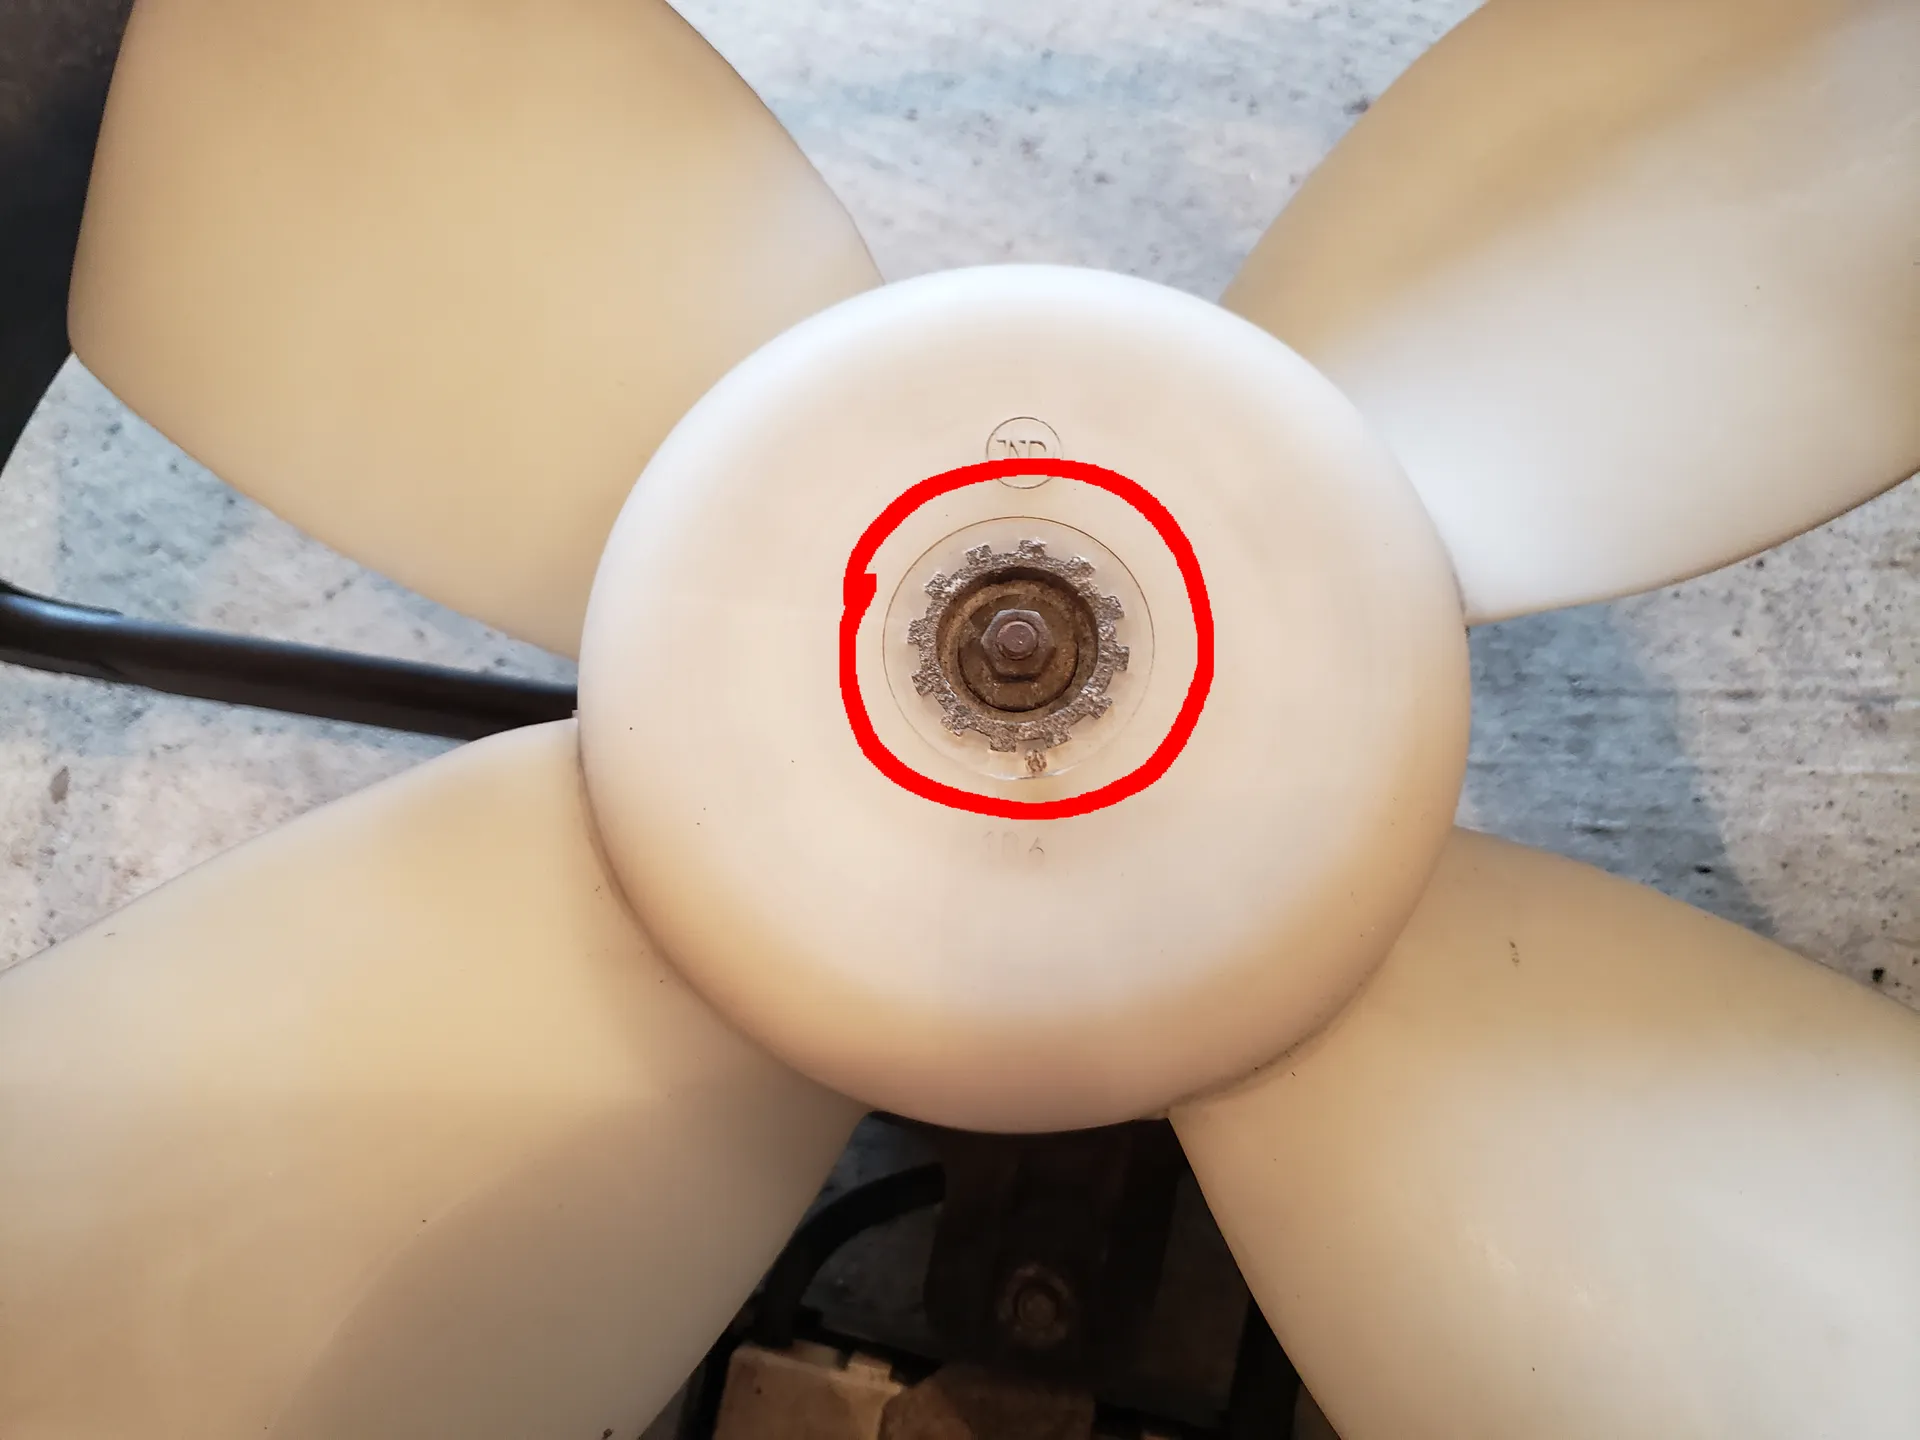 Step 8: Remove radiator fan motorThe last step in the disassembly process is to remove the radiator fan motor. There are three Phillips fan motor mounting screws holding the motor to the assembly, and they may be corroded. Penetrating fluid and a screw extractor set may help if the screws do not easily come out. I recommend replacing these with bolts and nuts to avoid this issue in the future. 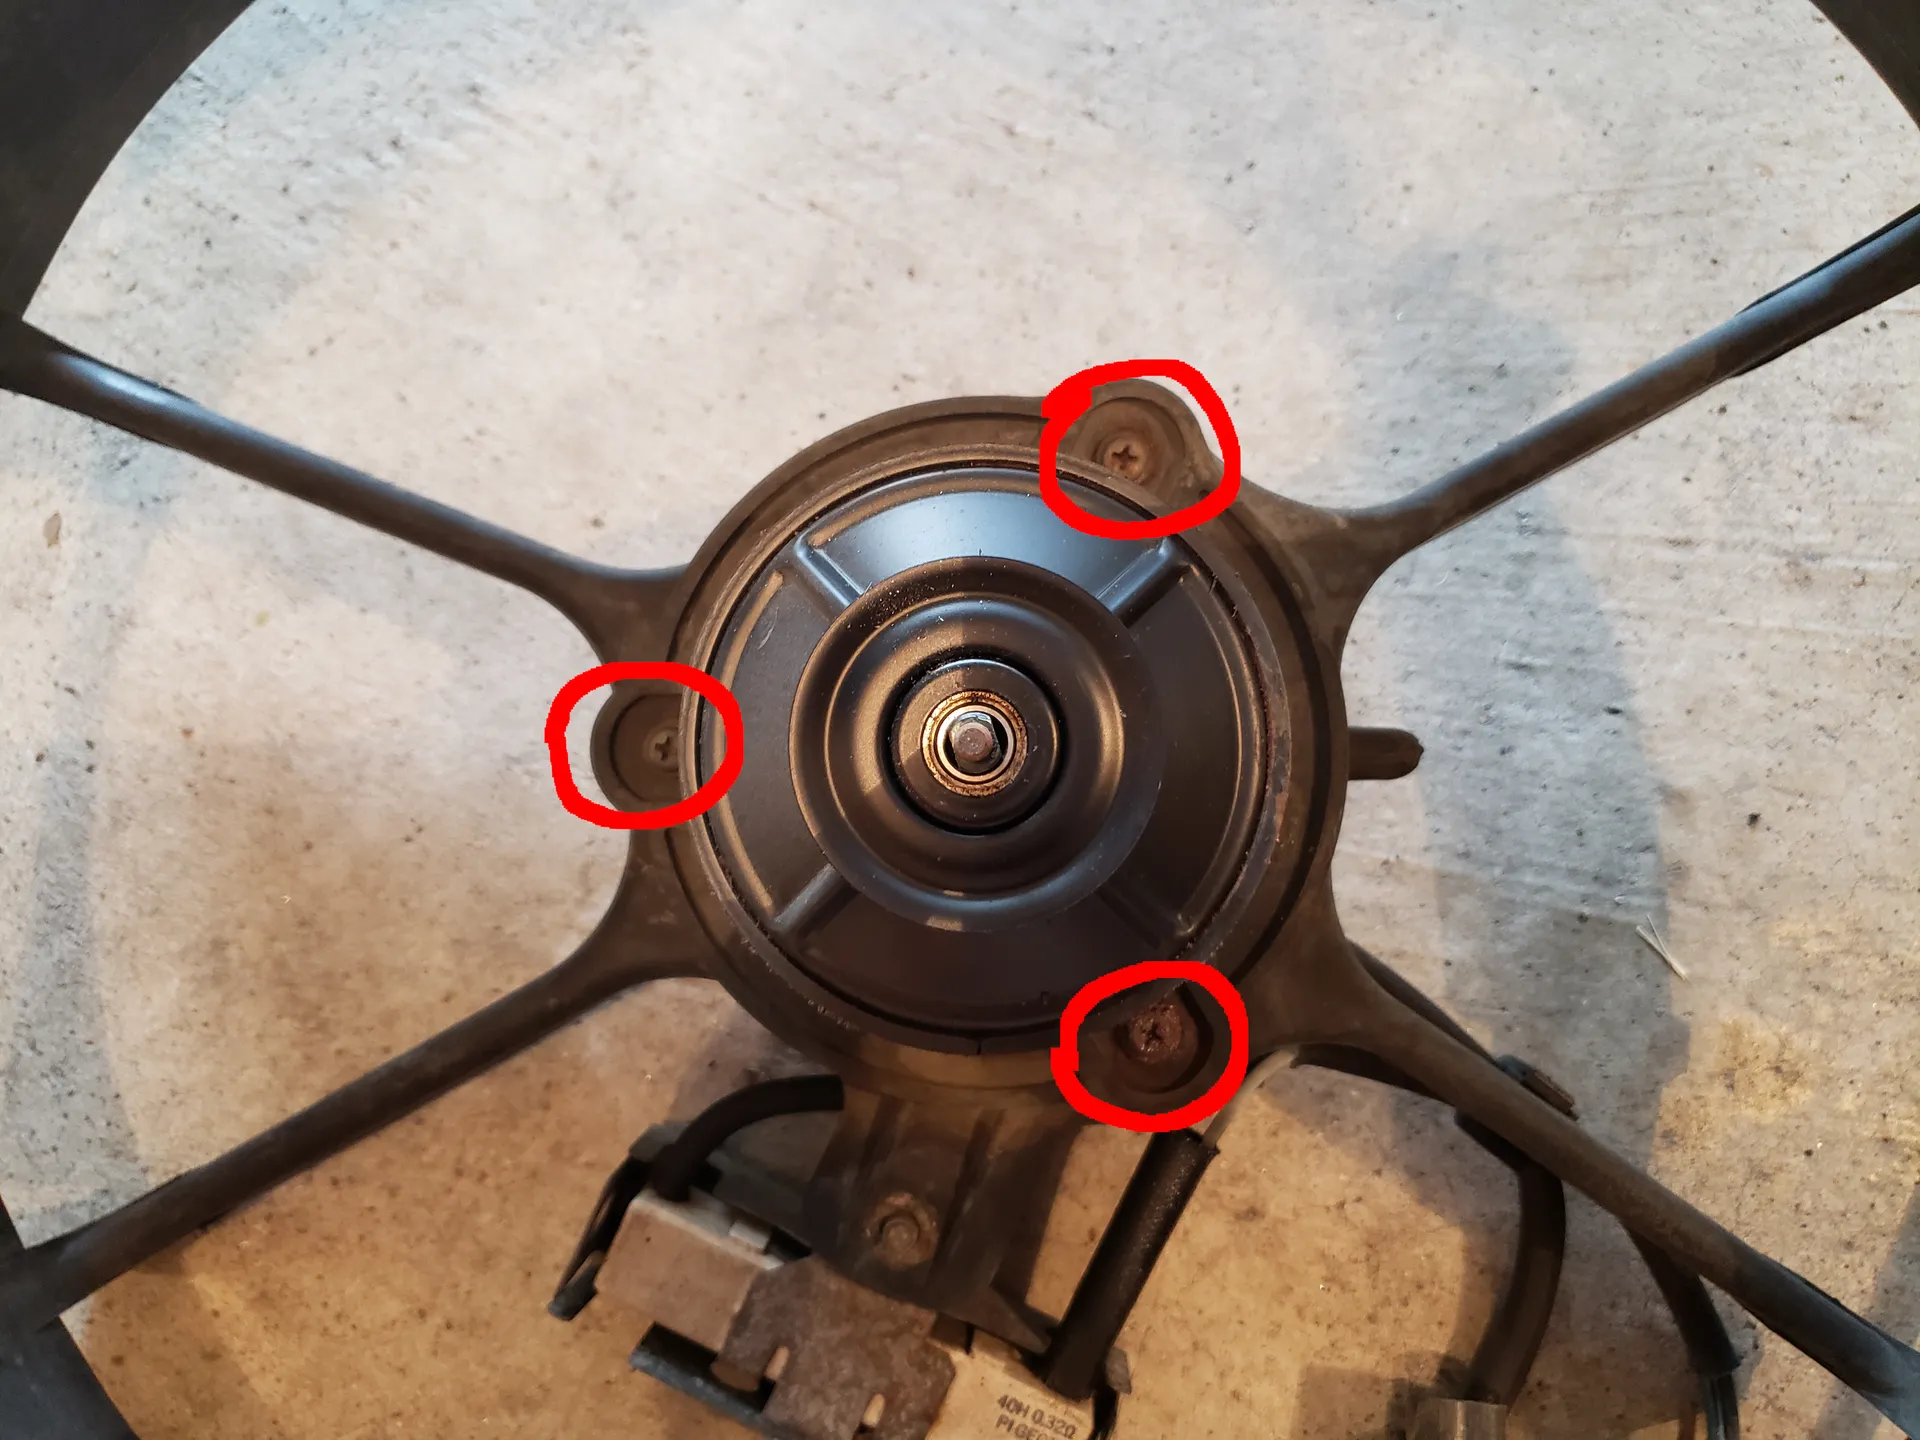 To remove the motor completely, the two wires going to the motor may need to be cut. If this is the case, cut where the two wires are visible before they combine with the temperature sensor wires inside the large cable sleeve. Once cut, there should be another cable sleeve around just the two motor wires. Pull this cable sleeve as it can be reused on the new motor wires. Once removed fully, compare the old and replacement motors to make sure they are the same size.
Step 9: Install new motor and bladesThe new motor can be inserted the same way the old one was mounted, with the wires routed through the small indent in the right of the fan assembly (resistor pointing up). The old screws or replacement bolt and nut can be used to hold the new motor in place.
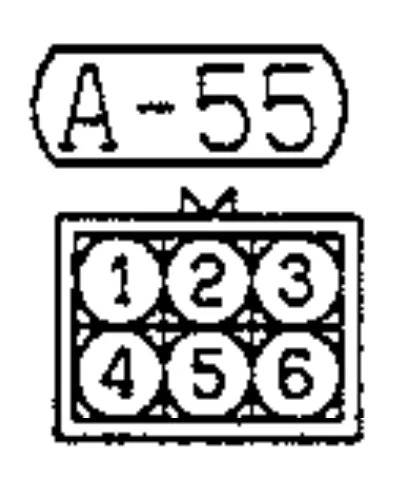
Once the motor is in place, the assembly can be turned over and the blades can be attached to the new motor. Use either the old flange nut or the nut/washer replacement combination and secure the blades to the motor. 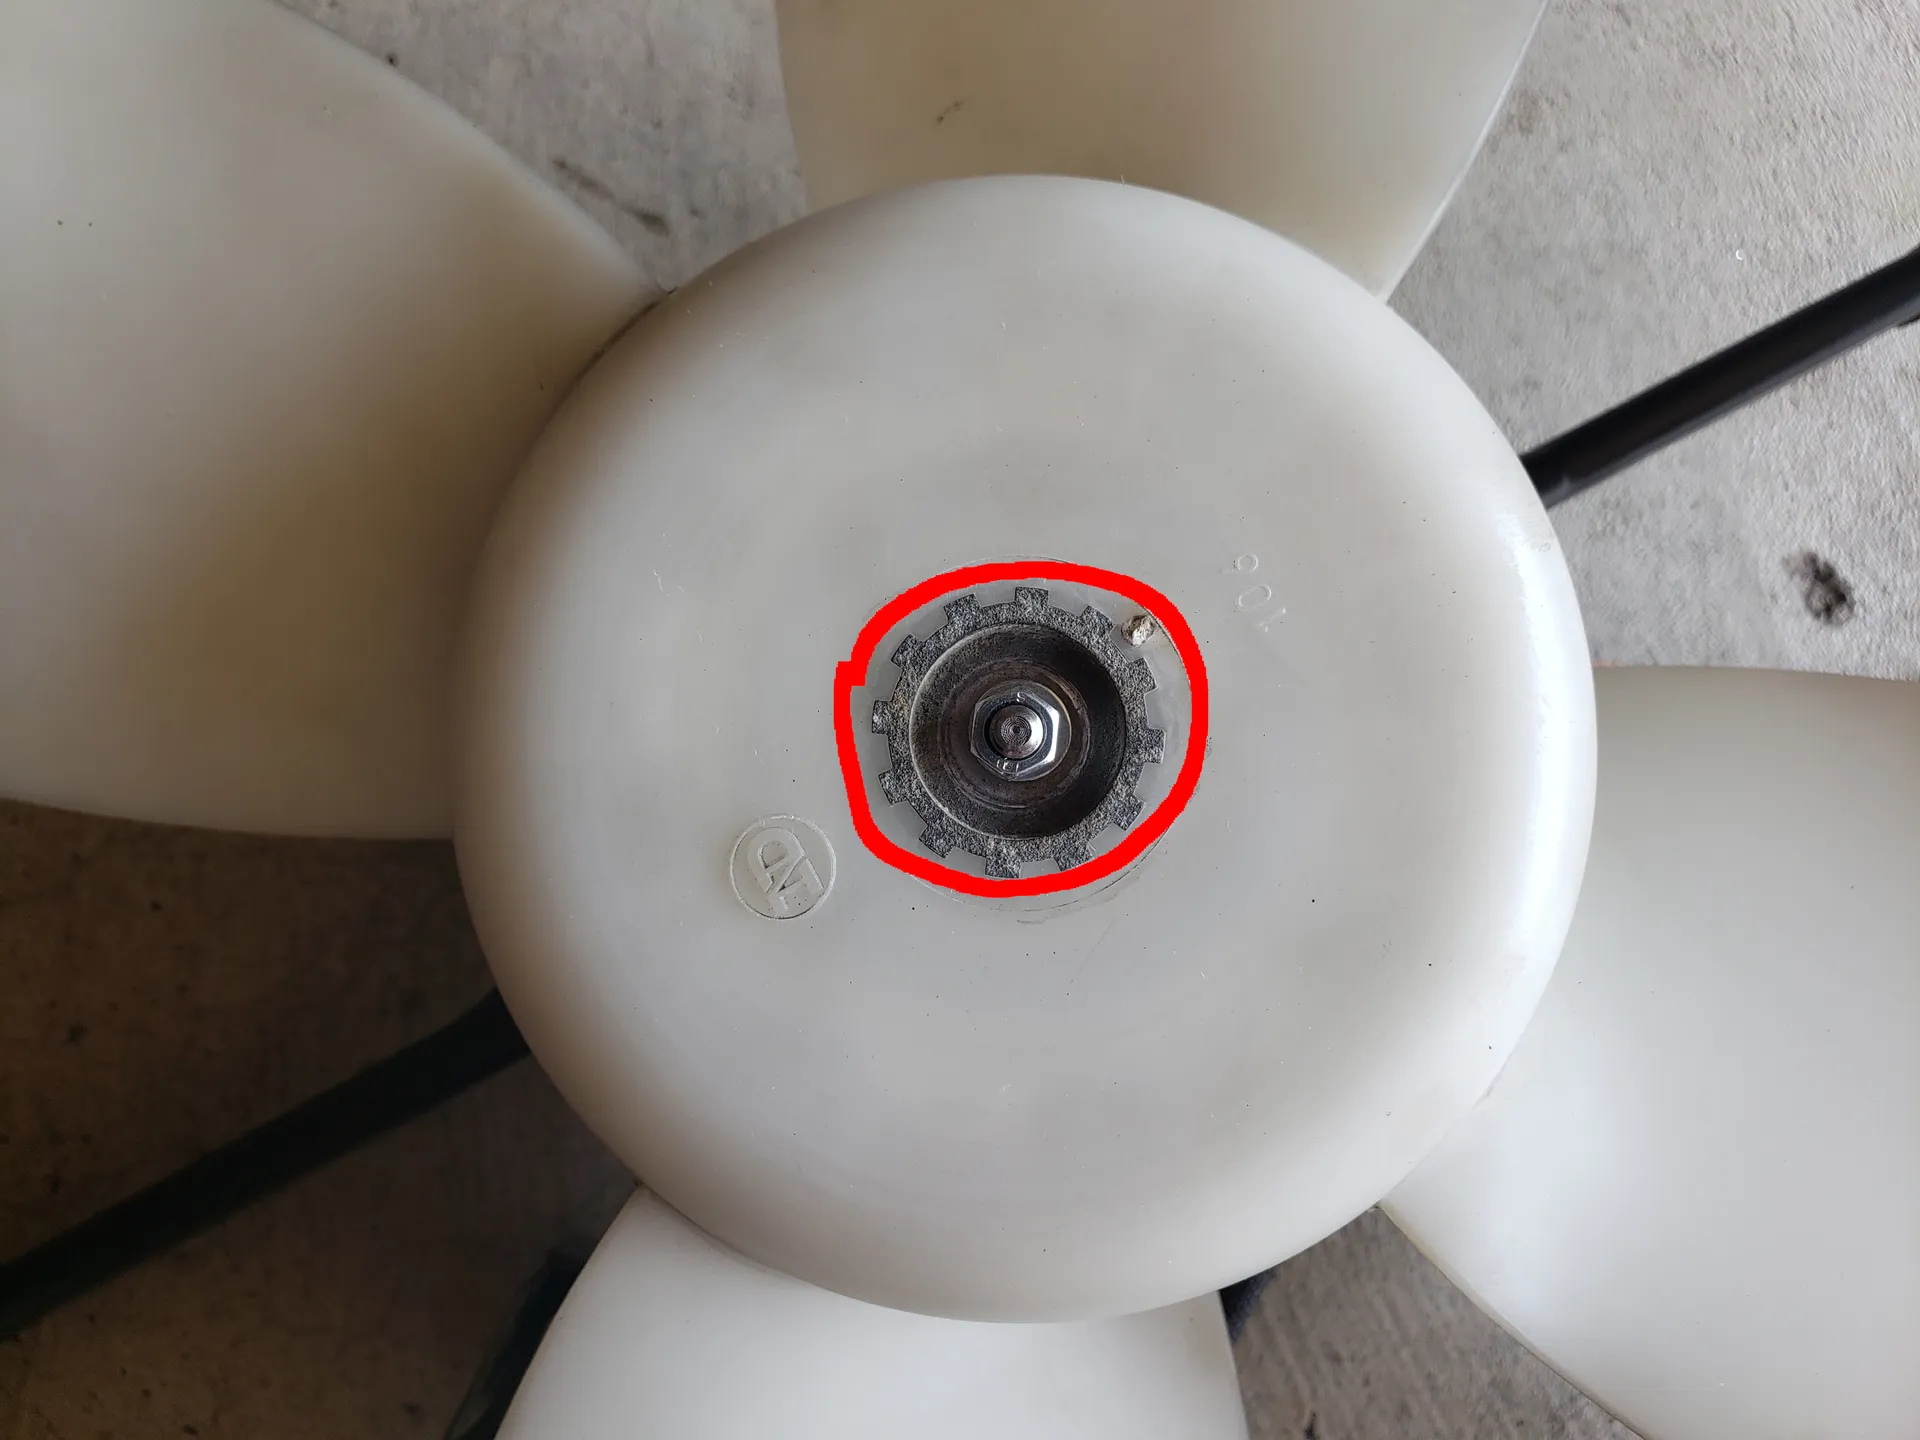 Step 10: Wire new motorThis is the most important and most complex step in replacing the fan motor. It is important that the fan is wired correctly, or the blades will spin the wrong direction and air flow will not be optimal. To test the motor spin direction, a 12V power supply can be used, but an adjustable bench power supply is more convenient, as the fan does not need to be spun to full speed to determine the spin direction. First, connect the two motor wires to a voltage source less than 12 volts. With the blades facing you, the motor should spin clockwise, and air should be pushed toward the motor. If the motor is spinning counterclockwise, reverse the power supply wires (flip 12V and ground wires) and make sure the fan spins clockwise. Once the fan is spinning correctly, mark the two fan motor wires (12V and ground). Now we can determine which of the wiring harness wires to solder these to. According to the Dodge Stealth repair manual (images below), 2 of the connections of the 6-pin connector attached to the fan assembly are used to power the fan. Using the first image below as a reference, pin 2 should supply 12V, while pin 5 acts as the ground wire. Test continuity using a multimeter to determine which of the cut wires is connected to 12V and ground. Mark these wires as well.
Once the 12V and ground wires are marked for both the motor and wiring harness wires, the wires can be soldered together. I recommend sliding heat tubing over each wire to prevent water damage and shorting over time, but electrical tape or other insulators may suffice. Additionally, this is the time to slide the old cable sleeve over the new motor wires to protect them from vibrations and friction. Once this preparation is complete, solder the wires together. In my case, the red wire from the motor was connected to the blue wire from the harness, and the black wire from the motor was connected to the black wire from the harness. 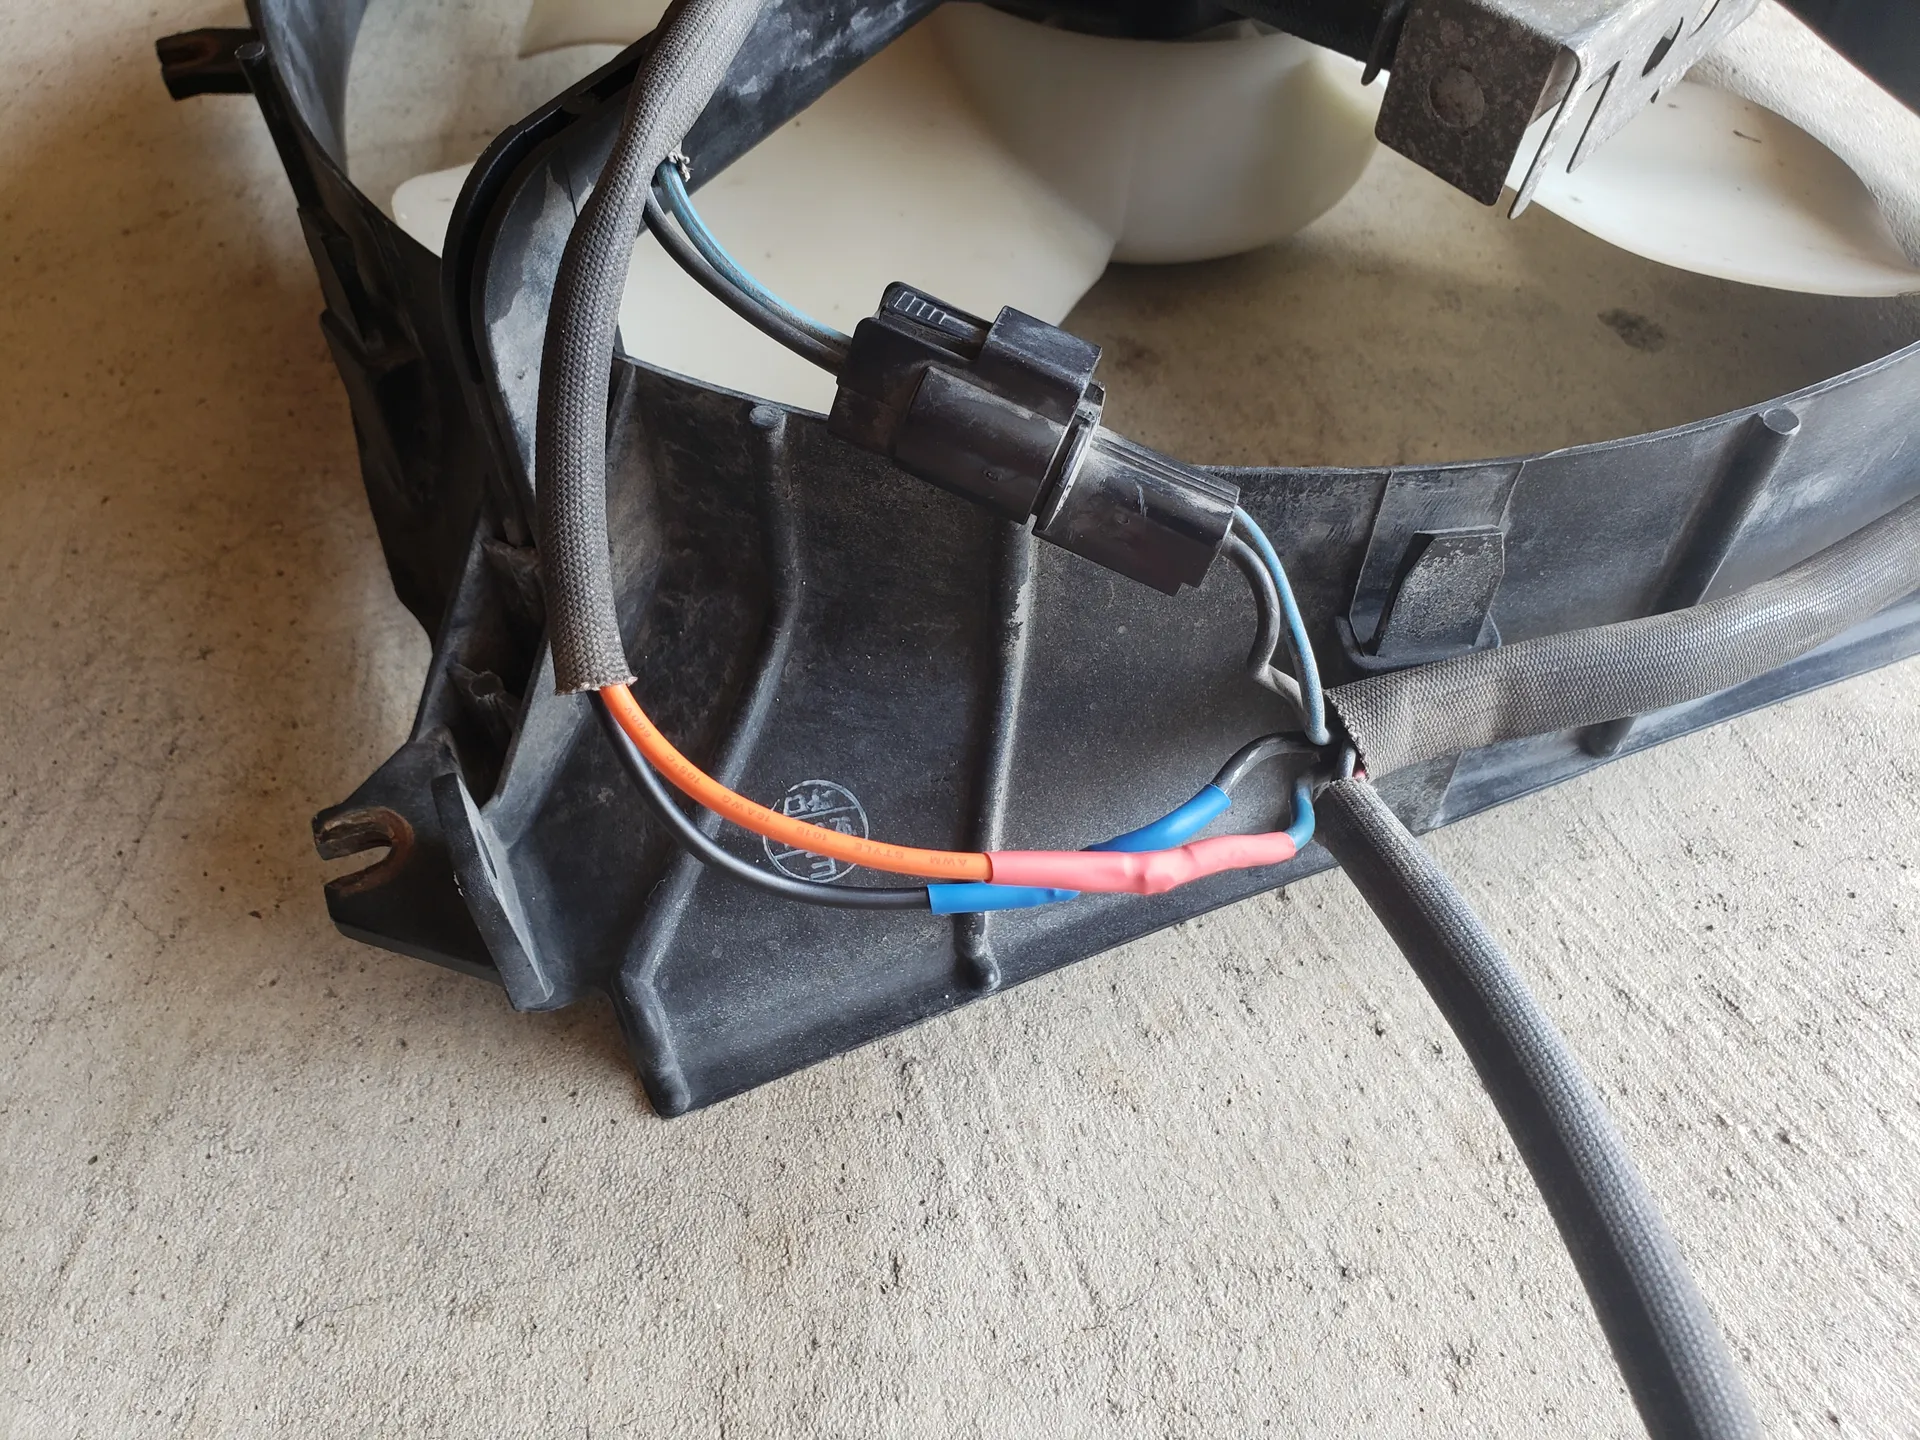 The motor cable sleeve can be slid through the cable clip built into the fan assembly to hold it in place. At this point, the new motor is almost ready for installation. 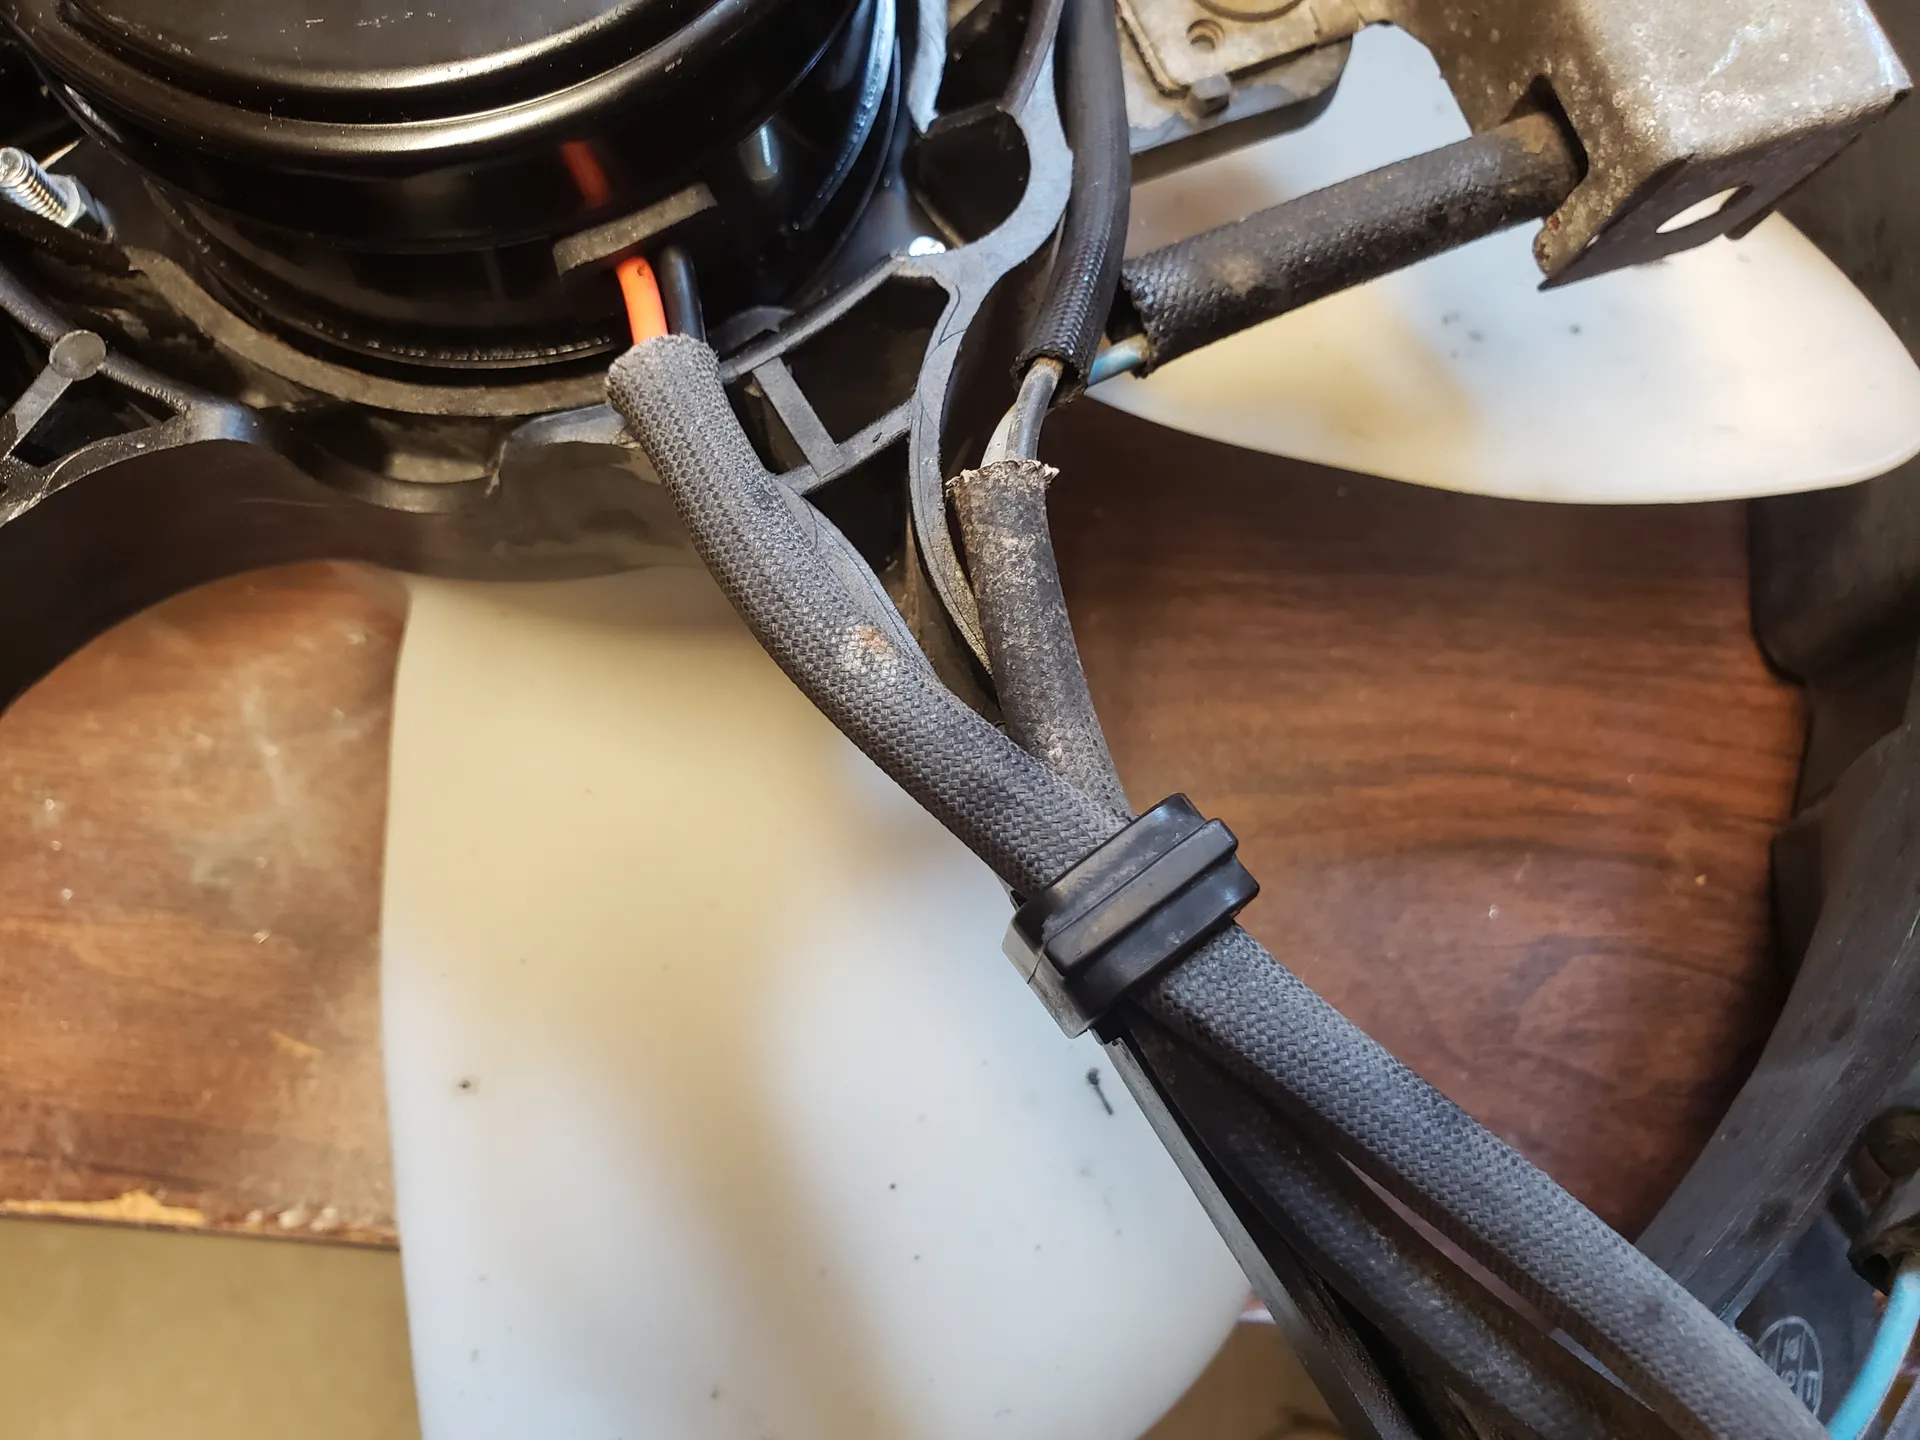 Step 11: Test new motorThe motor assembly can be tested without fully installing it in the car. To do this, turn the assembly so the plug is on the bottom (close to the wiring harness in the engine bay), and carefully connect the wiring harness and plug. 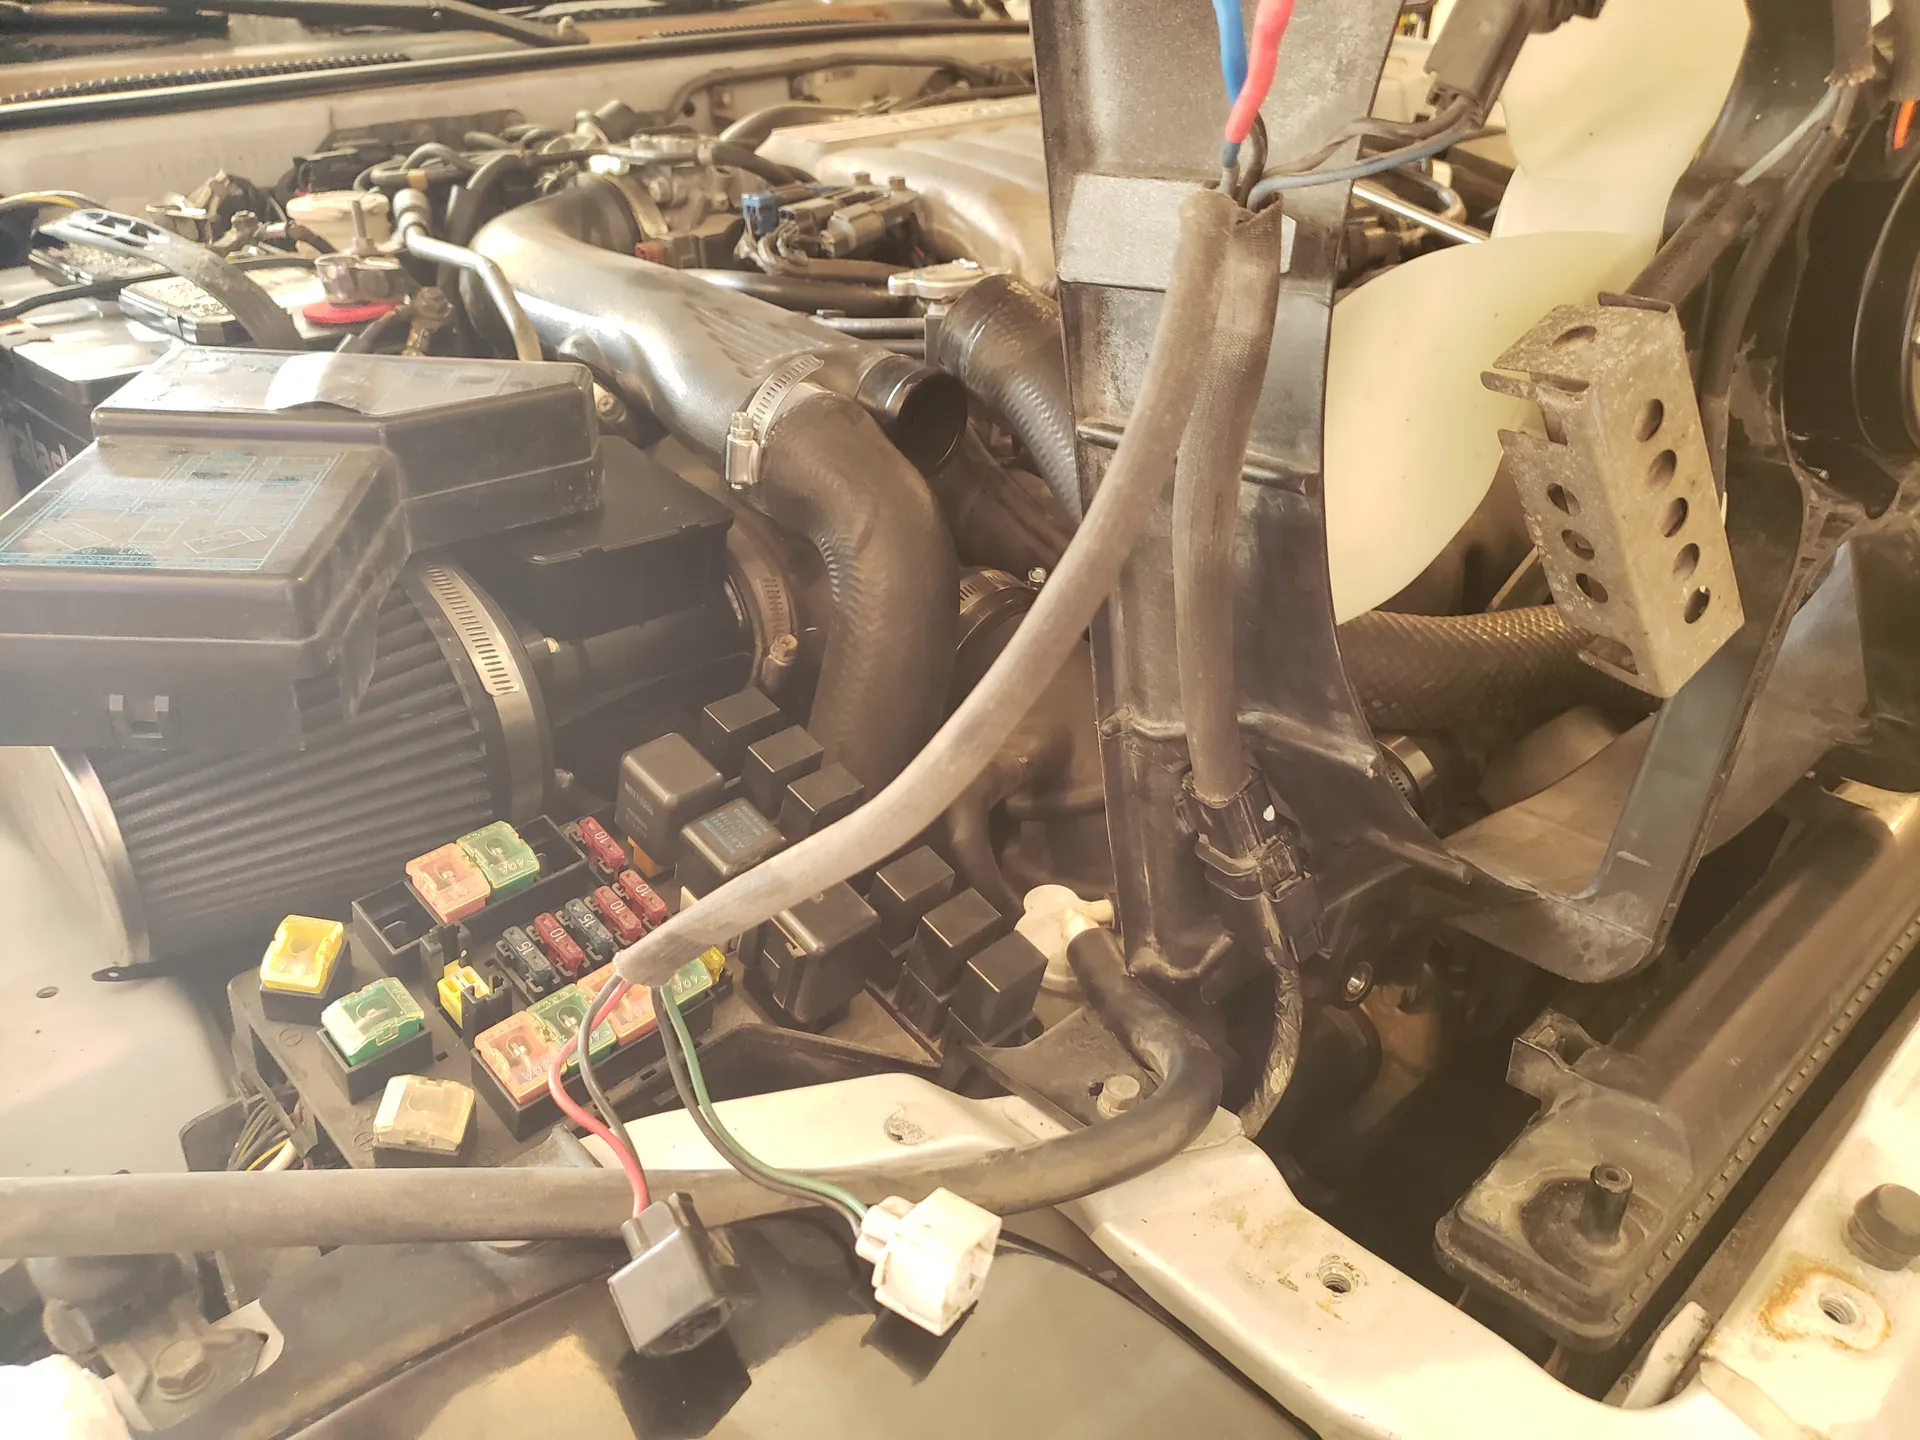 To test the motor, the car needs to be turned on (engine does not need to be started) and the air conditioning turned on. According to the fan operating mode found in the repair manual (image below), both the radiator fan and condenser fan should spin at low speed then the air conditioning is on. 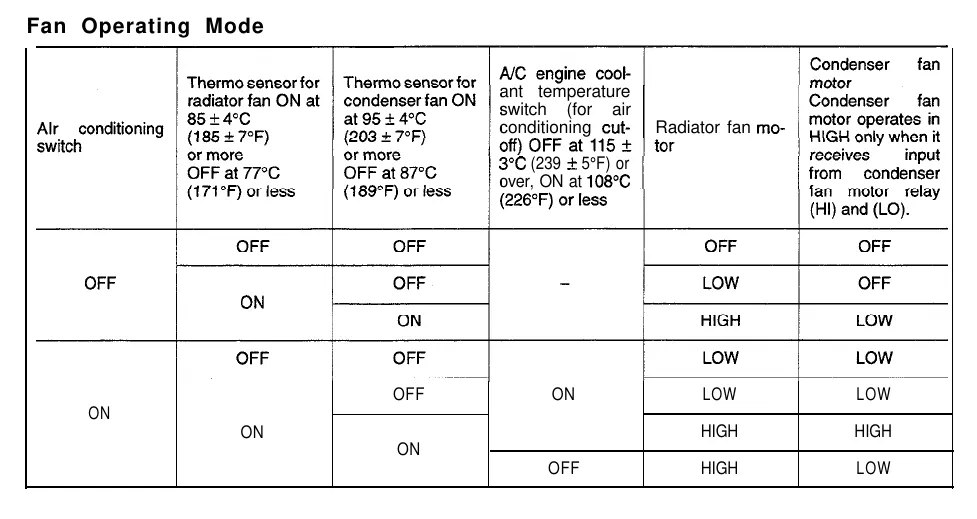 When testing the motor, be mindful of the fan blades. This step basically requires two people, one to turn on/off the air conditioning, and one to hold the fan assembly. The fan blades easily spin fast enough to cause serious injury, so perform this testing at your own risk. Step 12: Install fan assemblyFollowing the earlier steps in reverse order, the fan assembly can be inserted back into the engine bay. First, slide the assembly from the top of the engine bay, making sure the wiring harness plug is pointing up. Then, secure it to the radiator with the four fan shroud support bolts and reinstall the radiator support bracket. Make sure to connect the two temperature sensor plugs under the radiator and reattach and tighten any loose hoses. Test the fan motor again using the same technique in step 11, and drive the car around to make sure it isn’t overheating. If everything went well, the installation should be complete! 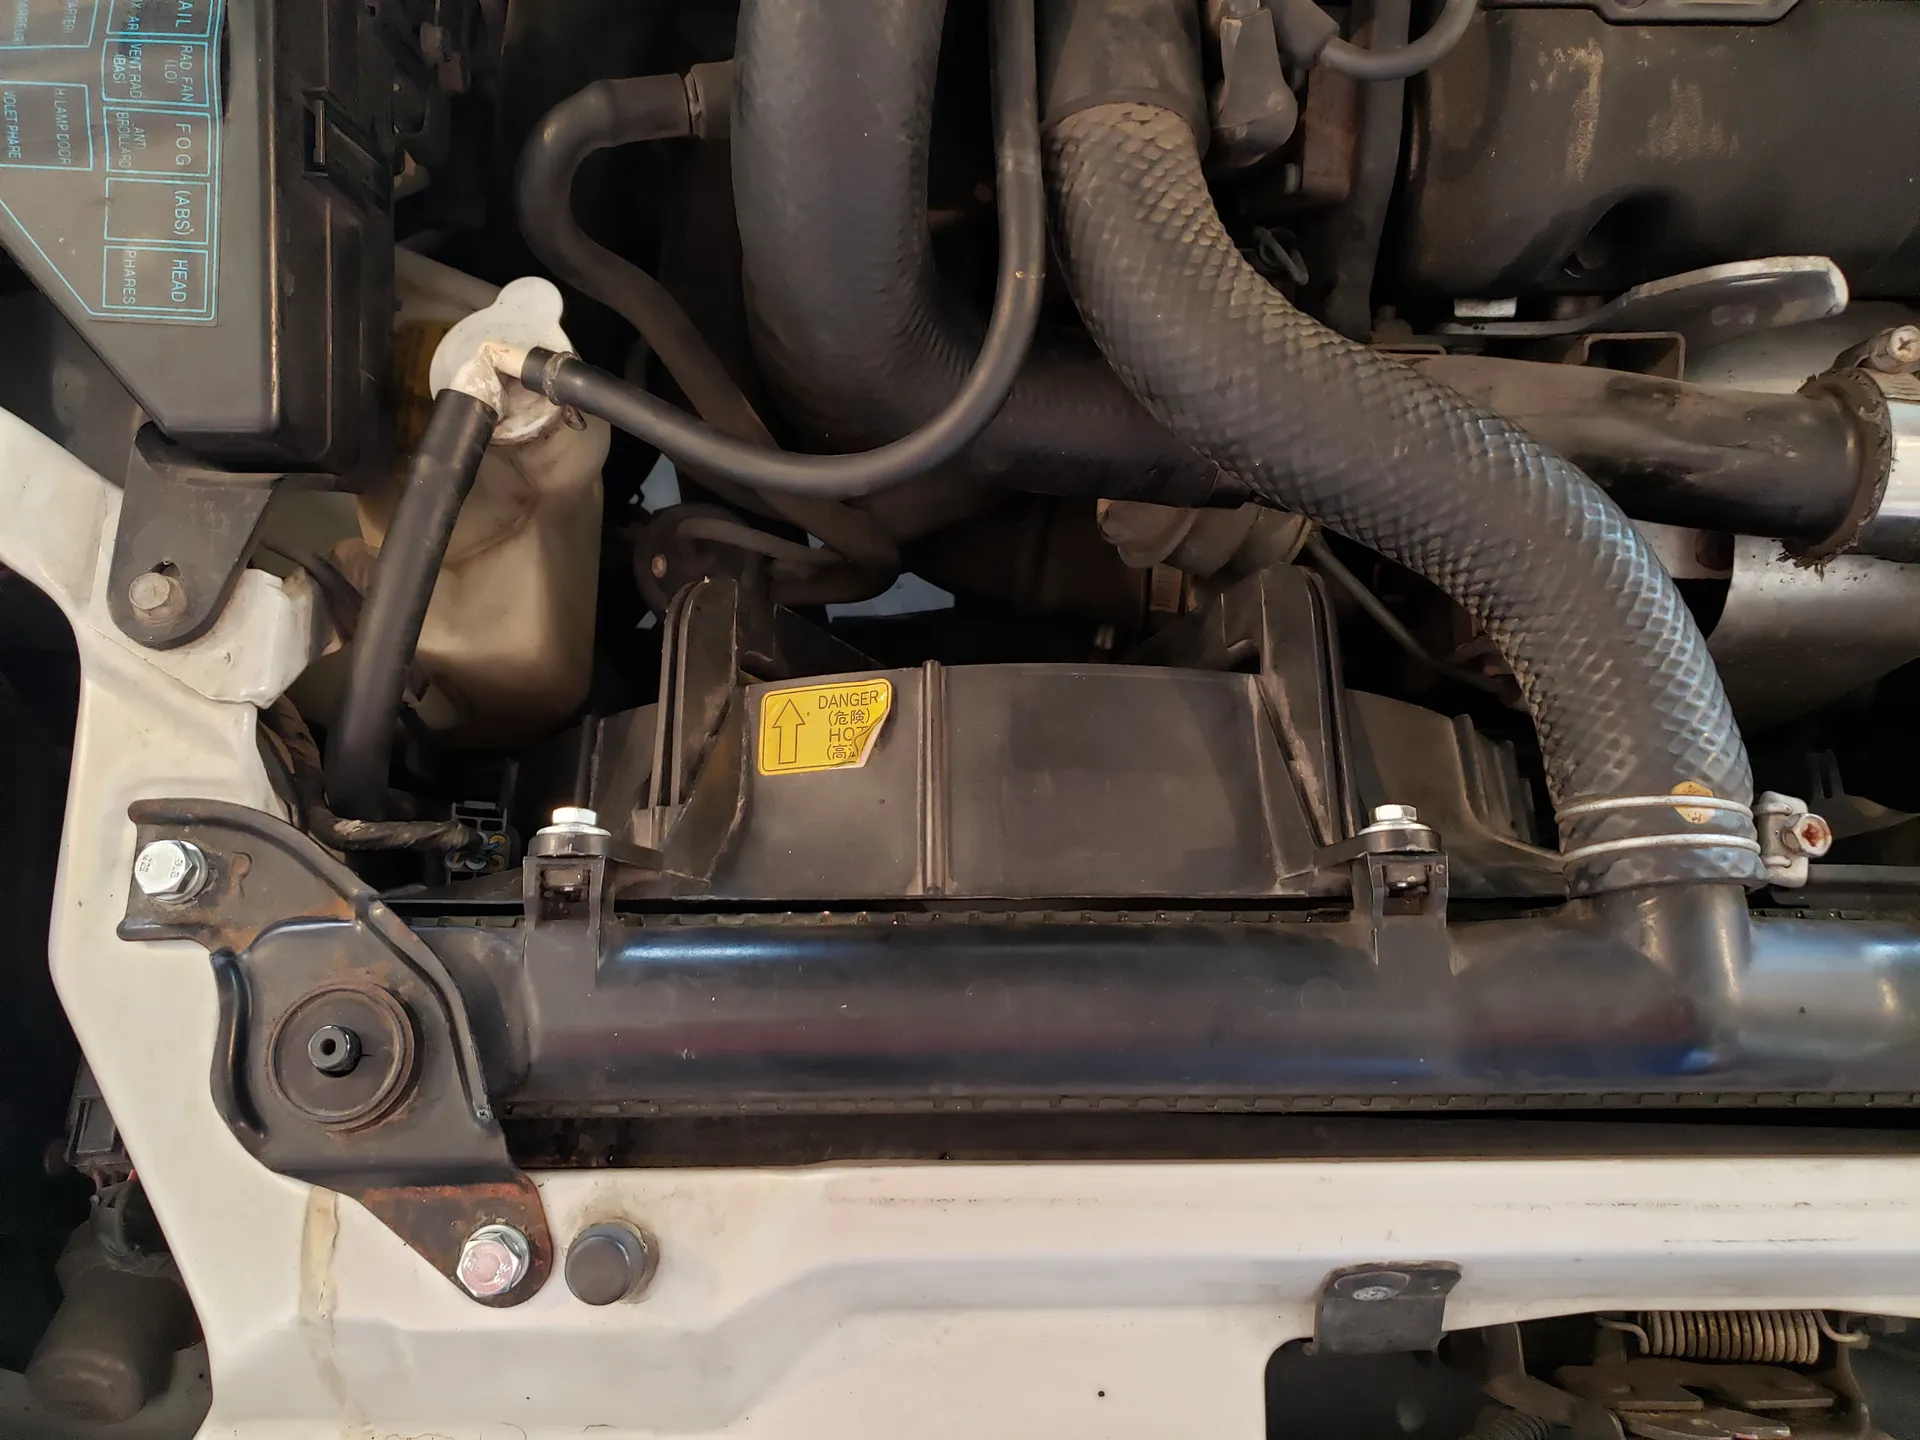 |
Ben's Universe v7.1.1.1 |
© 2013-2024 Benjamin Owen |
Contact Administrator |